介紹
Hugo是目前產生靜態網頁速度最快的,Hugo在中文資料上真的很少,剛好也搬到Hugo上筆記一下使用方法。
安裝Hugo
下載
以Windwos 10作業系統示範
下載hugo:https://github.com/gohugoio/hugo/releases
選擇版本,依最新版本為主,例如: hugo_0.72.0_Windows-64bit.zip
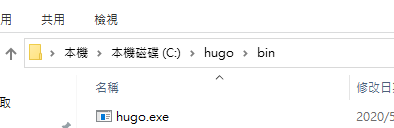
下載解壓縮,建立資料夾 路徑 C:\hugo\bin 將hugo.exe放入bin資料夾
環境變數
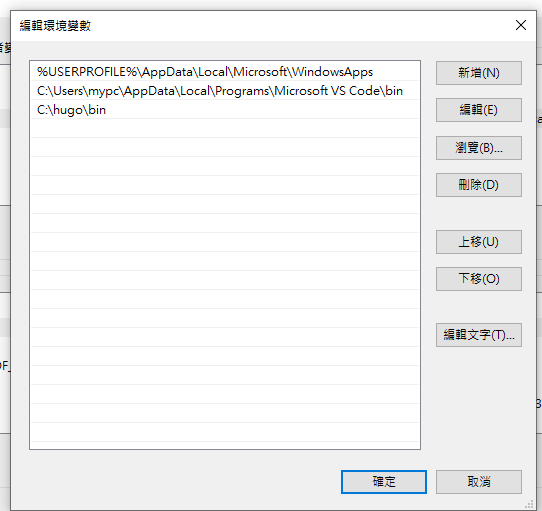
啟動環境變數
快捷鍵:win + R
輸入:rundll32.exe sysdm.cpl,EditEnvironmentVariables
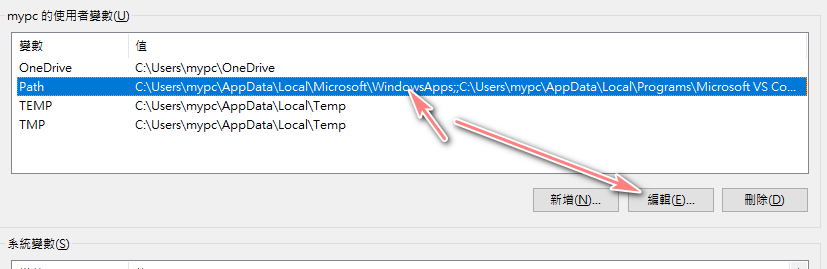
對PATH編輯,新增 > 輸入 C:\hugo\bin > 確定
安裝確認
開啟命列提示CMD
快捷鍵:win + R 輸入 cmd
輸入 hugo version

有顯示版本代表安裝正常
建立hugo網站
開啟命列提示CMD
快捷鍵:win + R 輸入 cmd
切換到要儲存的資料夾
cd c:\hugo
建立指令
hugo new site 網站資料夾名稱
hugo new site my_website
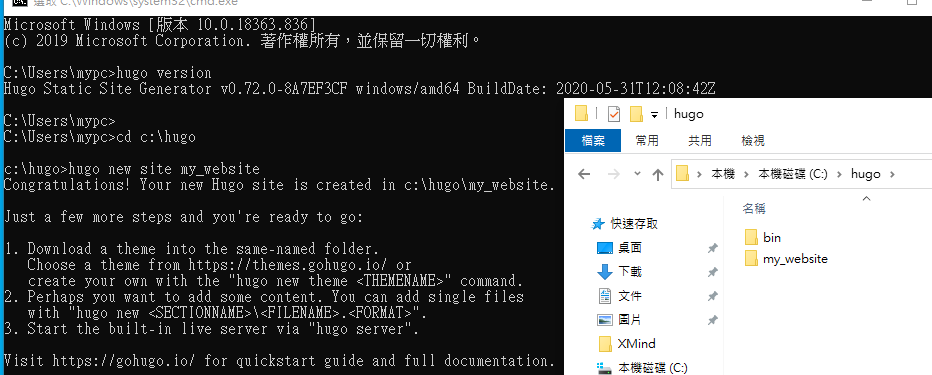
這樣就完成建立一個hugo啦。
安裝主題
clone需安裝git:git-scm.com
安裝一直點next就好了,安裝完成後請重新開啟命令列CMD
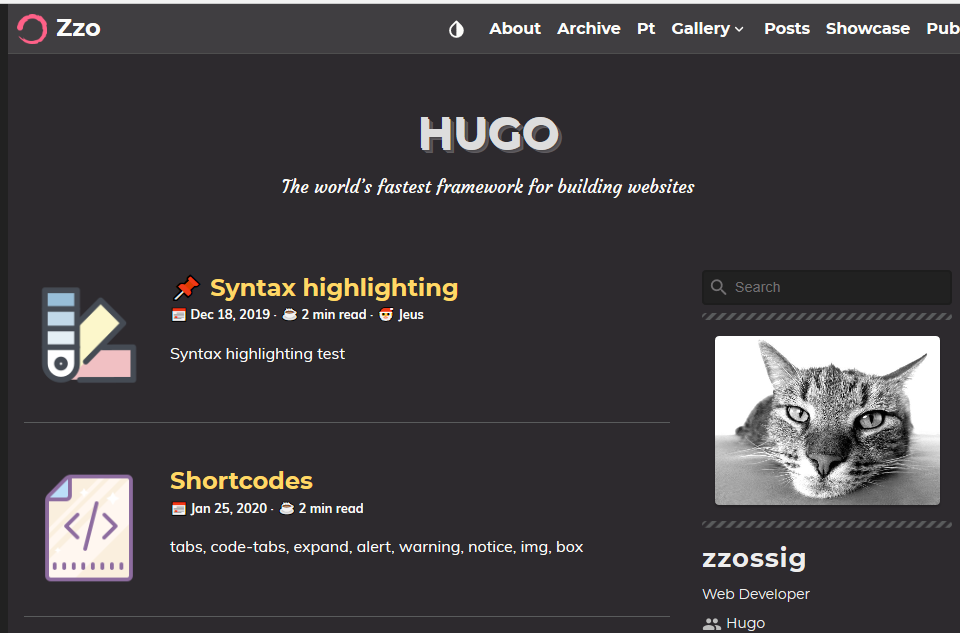
Hugo 沒有默認主題必須選一個主題安裝
選擇一個主題:themes.gohugo.io
選zzo當作例子:github.com/zzossig/hugo-theme-zzo
切換到建立好的網站資料夾
cd my_website
下載指令
git clone https://github.com/zzossig/hugo-theme-zzo.git themes/zzo
到themes\zzo,刪除.git隱藏資料夾
開啟隱藏項目,打勾 隱藏的項目

將zzo/exampleSite內的資料複製到根目錄資料夾
根目錄資料夾的config.toml刪除掉
每個主題都會有exampleSite 設計者對每個結構設計都不同所以必須一照exampleSite內的資料為主
注意:config資料夾為設定檔
啟動Hugo讓你的網站動起來
需再根目錄執行
執行 hugo server
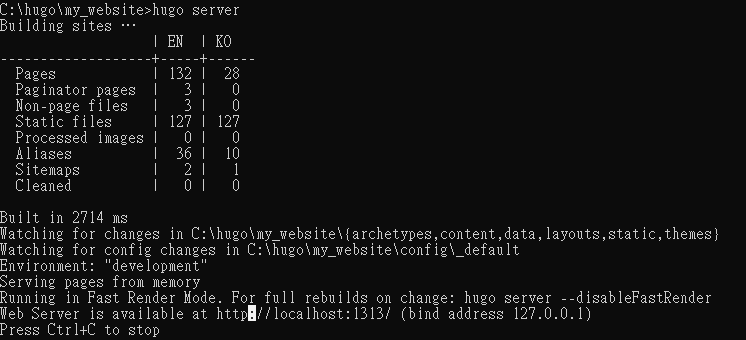
網頁上輸入:http://localhost:1313/
你的網站已經動起來啦
資料夾結構
- content 文章、頁面
- static 圖片、影片之類的
- themes 主題
- data 讓頁面讀取資料,如json檔
- layouts 修改主題的地方
想要更深入了解可以到官方文檔: gohugo.io/content-management/organization/
內容修改
安裝主題完成後還需要改成自己的東西才是一個完整的網站。
config\_default
config.toml 功能設定languages.toml 多語言設定menus.en.toml EN英文選單menus.ko.toml KO韓文選單params.toml 主題功能參數
了解更多看看zzo主題文檔:zzodocs.netlify.app/docs/configuration/configfiles/
config.toml
多語言設定,如果只使用單一語言可將多語言設為false,下面會有新增中文語言方法。
 1
 2
 3
 4
 5
 6
 7
 8
 9
10
|
defaultContentLanguage = "en" 若有設置多語言 設定默認的語言
defaultContentLanguageInSubdir = true 多語言網址 # baseURL/en/, baseURL/kr/ baseURL/zh/
hasCJKLanguage = true #自動檢測 使用者的語言 中日韓
summaryLength = 70 #描述內容 長度

[taxonomies] # 自訂更多的 分類 標籤
  category = "categories"
  tag = "tags"
  series = "series"
|
params.toml
介紹一些設定
 1
 2
 3
 4
 5
 6
 7
 8
 9
10
11
12
13
14
|
logoText = "Zzo" # 左上的logo文字
description = "The Zzo theme for Hugo example site." #網站首頁描述

themeOptions = ["dark", "light", "hacker", "solarized", "kimbie"] #主題顏色 默認 dark 要使用 light 將light排序在第一個位置

# whoami 修改作者資料
myname = "zzossig"
email = "[email protected]"
whoami = "Web Developer"
bioImageUrl = ""
useGravatar = false
location = "Seoul, Korea"
organization = "Hugo"
link = "https://zzossig.io/ko"
|
languages.toml
多語言網站標題、新增語言設定
 1
 2
 3
 4
 5
 6
 7
 8
 9
10
11
12
13
|
[en]
  title = "Hugo Zzo Theme" # 英文語言的網站標題
  languageName = "English"
  weight = 1
  languagedir = "ltr"
  contentdir = "content/en" # 文章內容的路徑

[ko]
  title = "Hugo Zzo Theme" # 韓語語言的網站標題
  languageName = "한국어"
  weight = 2
  languagedir = "ltr"
  contentdir = "content/ko" # 文章內容的路徑
|
新增中文語言
about
指令:hugo new zh/about/index.zh.md
編輯 zh/about/index.zh.md
1
2
3
4
5
6
7
8
|
---
title: "About"
date: 2019-10-09T11:44:14+09:00
type: "about"
description: 關於頁面
---

寫下關於你的故事
|
archive
指令: hugo new zh/archive/index.zh.md
編輯 zh/archive/index.zh.md
 1
 2
 3
 4
 5
 6
 7
 8
 9
10
|
---
title: "Archive"
date: 2019-10-19T11:44:14+09:00
type: "archive"
description: Archive Page
titleWrap: wrap
---

archive page
|
gallery cartoon
指令:hugo new zh/gallery/cartoon/index.zh.md
編輯 zh/gallery/cartoon/index.zh.md
 1
 2
 3
 4
 5
 6
 7
 8
 9
10
11
|
---
title: "Cartoon"
date: 2019-10-31T10:20:16+09:00
type: "gallery"
mode: "at-once" # at-once is a default value
description: "cartoon gallery"
image: images/feature2/bam.png
---

Sample images from [Pixabay](https://pixabay.com)
|
gallery photo
指令:hugo new zh/gallery/photo/index.zh.md
編輯 zh/gallery/photo/index.zh.md
 1
 2
 3
 4
 5
 6
 7
 8
 9
10
11
12
13
14
15
16
17
18
19
20
21
|
---
title: Photo
date: 2019-10-31T10:20:16+09:00
description: Photo Gallery
type: gallery
mode: one-by-one
description: "photo gallery"
images:
  - image: beach.jpg
    caption: beach, women, car
  - image: beautiful.jpg
    caption: beautiful women
  - image: people.jpg
    caption: man
  - image: child.jpg
    caption: child
image: images/feature2/gallery.png
---

Sample images from [Pixabay](https://pixabay.com)
|
posts
指令:hugo new zh/posts/index.zh.md
編輯 zh/posts/index.zh.md
1
2
3
4
5
6
7
|
+++
aliases = ["posts","articles","blog","showcase","docs"]
title = "Posts"
author = "Hugo Authors"
tags = ["index"]
description = "Post page"
+++
|
i18n zh.toml
編輯 themes\zzo\i18n\zh.toml
改成想要的詞彙
  1
  2
  3
  4
  5
  6
  7
  8
  9
 10
 11
 12
 13
 14
 15
 16
 17
 18
 19
 20
 21
 22
 23
 24
 25
 26
 27
 28
 29
 30
 31
 32
 33
 34
 35
 36
 37
 38
 39
 40
 41
 42
 43
 44
 45
 46
 47
 48
 49
 50
 51
 52
 53
 54
 55
 56
 57
 58
 59
 60
 61
 62
 63
 64
 65
 66
 67
 68
 69
 70
 71
 72
 73
 74
 75
 76
 77
 78
 79
 80
 81
 82
 83
 84
 85
 86
 87
 88
 89
 90
 91
 92
 93
 94
 95
 96
 97
 98
 99
100
101
|
[search-placeholder]
other = "搜尋"

[summary-dateformat]
other = "2006年01月02日"

[reading-time]
other = "分鐘"

[tags]
other = "標籤"

[categories]
other = "分類"

[series]
other = "系列"

[archive-dateformat]
other = "01-02"

[talks-dateformat]
other = "01月02日"

[single-dateformat]
other = "2006年01月02日"

[pub-dateformat]
other = "2006-01-02"

[resume-dateformat]
other = "2006年01月"

[single-related]
other = "相關文章"

[single-writtenBy]
other = "作者"

[toc-label]
other = "目錄"

[counter-site-pv]
other = "總瀏覽"

[counter-site-uv]
other = "總訪客"

[counter-page-pv]
other = "閱讀"

[donate-message]
other = "妳的鼓勵是我最大的動力"

[share-message]
other = "分享"

[contact-name]
other = "姓名"

[contact-email]
other = "電子信箱"

[contact-tel]
other = "Tel"

[contact-file]
other = "File"

[contact-message]
other = "訊息"

[contact-send]
other = "發送"

[contact-browse]
other = "Browse"

[tooltip-home]
other = "首頁"

[tooltip-written]
other = "建立日期"

[tooltip-modified]
other = "更新日期"

[tooltip-reading-time]
other = "閱讀時長"

[showcase-overview]
other = "總覽"

[showcase-pinned]
other = "固定"

[nojs-message]
other = "Please enable Javascript to view the contents"

[posts-by-order]
other = "TOP POSTS"
|
content zh
將 \content\ko\_index.md 複製_index.md到\content\zh\_index.md
編輯\config\_default\config.toml
1
2
3
|
defaultContentLanguage = "zh" #默認中文語言
defaultContentLanguageInSubdir = true #不使用多語言請直接設定false
hasCJKLanguage = true #不使用多語言請直接設定false
|
languages
編輯\config\_default\languages.toml
新增 繁體中文選項
 1
 2
 3
 4
 5
 6
 7
 8
 9
10
11
12
13
14
15
16
17
18
19
20
21
|
[en]
  title = "Hugo Zzo Theme"
  languageName = "English"
  weight = 1
  languagedir = "ltr"
  contentdir = "content/en"

[ko]
  title = "Hugo Zzo Theme"
  languageName = "한국어"
  weight = 2
  languagedir = "ltr"
  contentdir = "content/ko"


[zh]
  title = "Hugo Zzo Theme"
  languageName = "繁體中文"
  weight = 3
  languagedir = "ltr"
  contentdir = "content/zh"
|
建立文章
寫點文章
建立文章指令hugo new zh/posts/第一篇文章.md
 1
 2
 3
 4
 5
 6
 7
 8
 9
10
11
12
13
14
15
16
17
18
19
20
21
22
23
24
|
---
title: "第一篇文章"
url: /first-post
date: 2020-06-20T21:26:52+08:00
draft: false
author: "MIMI"
date: 2019-12-16T12:00:06+09:00
description: "我的第一篇文章"
draft: false
hideToc: false
enableToc: true
enableTocContent: false
categories:
- 個人文章
tags:
- 一篇文章
- 部落格
---

文檔[zzodocs.netlify.app/docs/configuration/multilanguage/](https://zzodocs.netlify.app/docs/configuration/multilanguage/)

## 第一篇文章

太棒了
|
執行Hugo
Hugo server
建立文章
建立文章指令:hugo new content\zh\文章名稱.md
設定文章默認選項
編輯
archetypes\default.md
例子
draft: true 是使用草稿如果不想使用草稿設定成false,
image: /圖片
 1
 2
 3
 4
 5
 6
 7
 8
 9
10
11
12
13
14
|
---
title: "{{ replace .Name "-" " " | title }}"
date: {{ .Date }}
draft: true
author: 作者名稱
description: 描述內容
url: /自訂網址
image: /圖片
categories:
  - 設定分類
tags:
  - 設定tag標籤
  - 設定tag標籤
---
|
這樣之後只要產生文章都會使用這些設定,不必在複製貼上,也可以加上自己想要的內容
圖片位置結構
素材需放在static資料夾內
static/images
圖片網址會是http://localhost:1313/images/abc.jpg
簡碼 shortcodes
Hugo本身有提供很多簡碼,像是很常用的youtube、instagram、twitter都有已經做好了
youtube
https://www.youtube.com/watch?v=w7Ft2ymGmfc
{{< youtube w7Ft2ymGmfc >}}
自動播放
{{< youtube id="w7Ft2ymGmfc” autoplay="true">}}
instagram使用方法
https://www.instagram.com/p/BWNjjyYFxVx/
{{< instagram BWNjjyYFxVx >}}
隱藏標題
{{< instagram BWNjjyYFxVx hidecaption>}}
超多簡碼使用方法
官方文檔:gohugo.io/content-management/shortcodes/
https://twitter.com/spf13/status/877500564405444608
{{< tweet 877500564405444608 >}}
加入google ad
任何主題都適用
以自動廣告為主做為加入
在partials建立google資料夾
路徑:themes\zzo\layouts\partials\google
goolge內建立一個 adsense.html
在adsense.html放入廣告代碼
1
|
<script data-ad-client="修改為你的" async src="https://pagead2.googlesyndication.com/pagead/js/adsbygoogle.js"></script>
|
編輯themes\zzo\layouts\_default\baseof.html
插入代碼,找到有{{ partial }}的代碼放在一起
{{ partial "google/adsense" . }}
ads.txt
將ads.txt放置static資料夾內,只要產生頁面後會自動放在根目錄
Google Analytics
使用靜態網站,Analytics是必備的工具,Hugo已經有寫好只需要設定。
編輯 config\_default\config.toml
zzo 主題直接搜尋 googleAnalytics
加入
googleAnalytics = "UA-XXX-XX"
相關文檔:gohugo.io/templates/internal/
相關文章設定
zzo主題已經有做相關文章的html,現在只需要設定一下就可以使用
編輯 config\_default\config.toml 最下方加入以下
 1
 2
 3
 4
 5
 6
 7
 8
 9
10
11
|
[related]

  [[related.indices]]
  name = "categories" # 以分類作為相關
  weight = 1.0
  includeNewer = true

  [[related.indices]]
  name = "tags" # 以tags作為相關
  weight = 1.0
  includeNewer = true
|
使用任何主題可以看一下作者有沒有加入相關文章設定
搜尋 Site.RegularPages.Related 有找到代表有設定
上傳github及netlify使用
到這裡就代表完成你的網站啦,最後就是上傳,我使用github加netlify,netlify會從你的github repository clone到netlify伺服器部署。
兩種方法
- giuhub page
- netlify
HAPPY8
github
只想上傳到github需要這樣做
指令 輸入 Hugo
根目錄會看到一個public資料夾將裡面資料上傳到github。
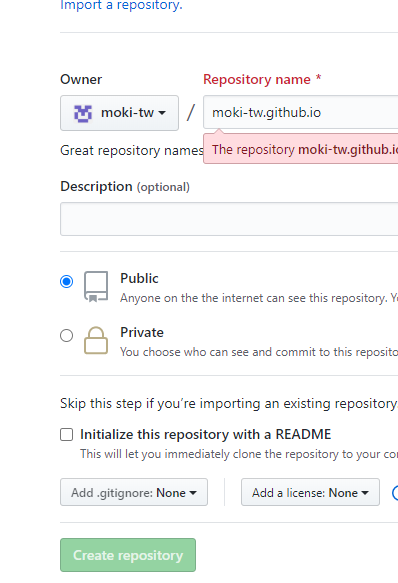
github建立資料庫
新增一個repository github.com/new
要使用網站必須輸入名稱.github.io
必須與名稱相同 例如:網址結構是 moki.github.io
一定要設定Public
設定網址
編輯 config\_default\config.toml
我的網址是https://moki.github.io,請設定成你的網址
baseURL = "https://moki.github.io"
上傳
.gitignore可選擇使用或不使用
禁止上傳到gitgub的檔案或資料夾
建立.gitignore檔案,不用輸入任何副檔名,.gitignore裡面輸入.gitignore,可以輸入不想上傳的資料夾或文件。
切換到public資料夾 cd public
執行以下
資料庫網址改成你的
git init
git add .
git commit -m "first hugo commit"
git remote add origin https://github.com/moki-tw/hugo.github.io.git
git push -u origin master
你的網站就完成啦
使用script(腳本)
方便之後寫完文章只要點一下就會產生網頁並自動上傳
放在根目錄,建立檔案deploy.sh
 1
 2
 3
 4
 5
 6
 7
 8
 9
10
11
12
13
14
15
16
17
18
19
20
21
22
23
24
25
|
#!/bin/sh

# If a command fails then the deploy stops
set -e

printf "\033[0;32mDeploying updates to GitHub...\033[0m\n"

# Build the project.
hugo # if using a theme, replace with `hugo -t <YOURTHEME>`

# Go To Public folder
cd public

# Add changes to git.
git add .

# Commit changes.
msg="rebuilding site $(date)"
if [ -n "$*" ]; then
	msg="$*"
fi
git commit -m "$msg"

# Push source and build repos.
git push origin master
|
以後寫完文章或其他設定只需點一下deploy.sh就會自動上傳
netlify
使用netlify服務不需要產生頁面,如果有產生過的public資料夾先刪除。
建立設定檔 netlify.toml
建立設定檔,根目錄建立一個netlify.toml
設定如下
 1
 2
 3
 4
 5
 6
 7
 8
 9
10
11
12
13
14
15
16
17
18
19
20
21
22
23
24
25
26
27
28
29
30
|
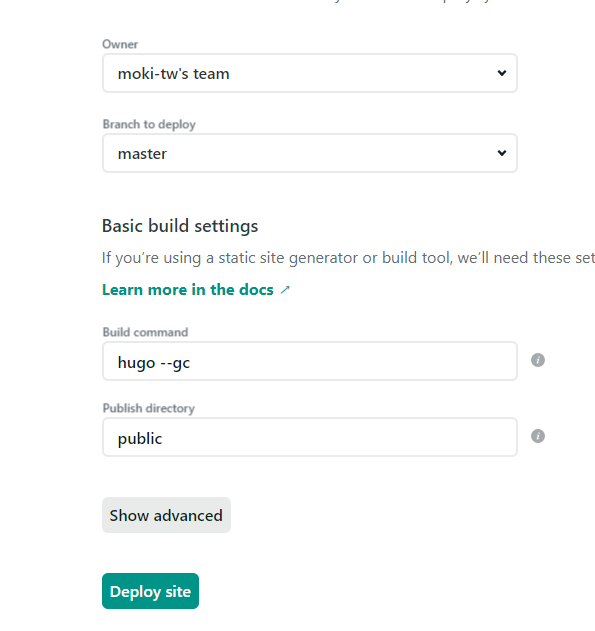
[build]
publish = "public"
command = "hugo --gc"

[context.production.environment]
HUGO_VERSION = "0.72.0"
HUGO_ENV = "production"
HUGO_ENABLEGITINFO = "true"

[context.split1]
command = "hugo --gc"

[context.split1.environment]
HUGO_VERSION = "0.72.0"
HUGO_ENV = "production"

[context.deploy-preview]
command = "hugo --gc --minify --buildFuture -b $DEPLOY_PRIME_URL"

[context.deploy-preview.environment]
HUGO_VERSION = "0.72.0"

[context.branch-deploy]
command = "hugo --gc --minify -b $DEPLOY_PRIME_URL"

[context.branch-deploy.environment]
HUGO_VERSION = "0.72.0"

[context.next.environment]
HUGO_ENABLEGITINFO = "true"
|
上傳到github
.gitignore可選擇使用或不使用
根目錄建立.gitignore檔案,不用輸入任何副檔名,.gitignore裡面輸入.gitignore,可以輸入不想上傳的資料夾或文件。
cd到根目錄,資料庫網址改成你的
git init
git add .
git commit -m "first hugo commit"
git remote add origin https://github.com/moki-tw/hugo.github.io.git
git push -u origin master
netlify 使用方法
註冊帳號
https://app.netlify.com/
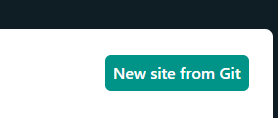
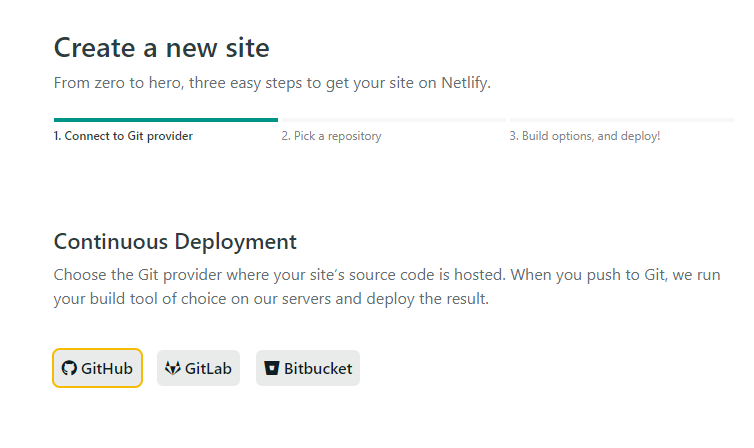
點選New site from Git
選擇Github
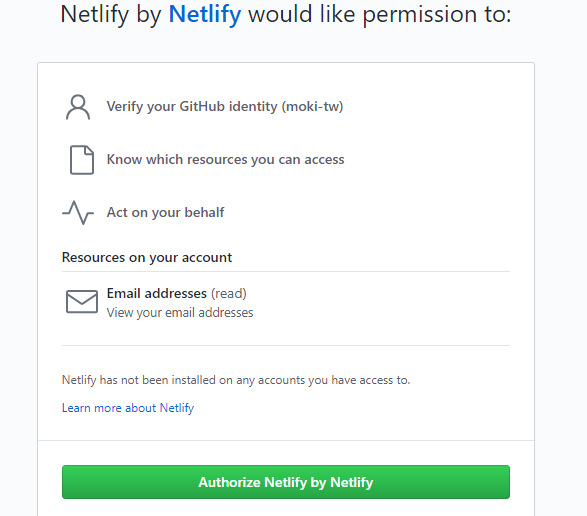
點選Authorize netlify by Netlify,會讀取得你的repository
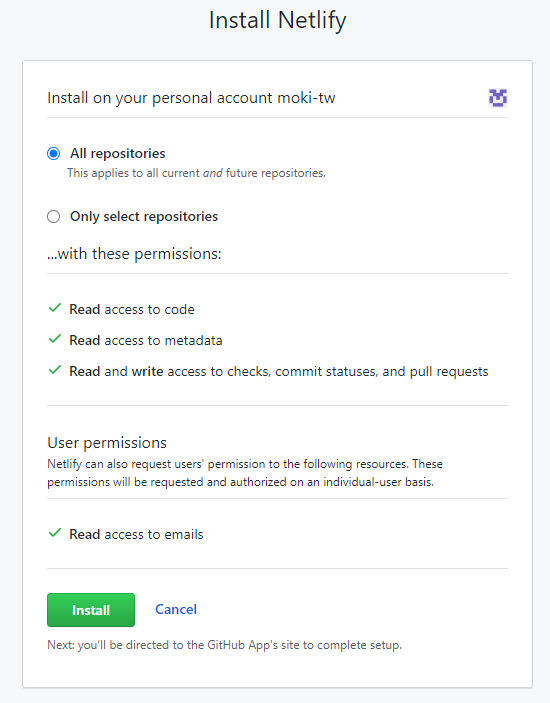
點選Install
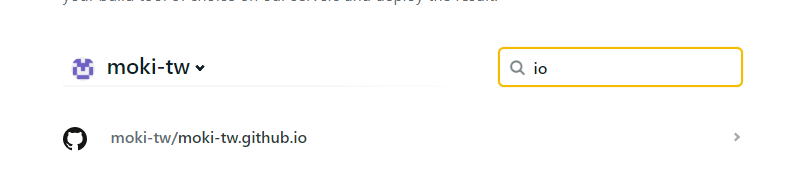
選擇repository,當你有很多repository 記得使用搜尋功能
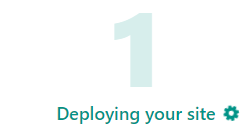
會自動讀取設定,直接選擇Deploy site
點選Delpoying your site可以看到部署狀態。
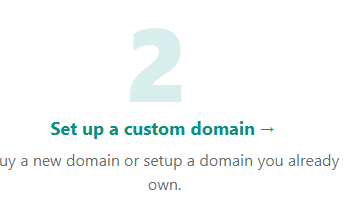
取得網址

到設定檔修改網址在重新Push到github
https://distracted-hodgkin-432277.netlify.app
設定網址
編輯 config\_default\config.toml
baseURL = "https://distracted-hodgkin-432277.netlify.app"
git push
git add .

git commit -m "first hugo commit"

git push -u origin master
只要你的github repository有更新,netlify會自動部署,超級方便的服務,免費方案有提供每個月100GB流量。
netflify也可以對private(私人)部署,不想讓網站資料被google到可以設定成(private)。
也可以設定網域,點選 domain,照著說明步驟走就可以了,可以搭配Cloudflare
不只兩種方法還有很多種方法可以部署你的網站看看文檔
官方文檔:gohugo.io/hosting-and-deployment/
使用script(腳本)
方便之後寫完文章只要點一下就會產生網頁並自動上傳
放在根目錄,建立檔案deploy.sh
 1
 2
 3
 4
 5
 6
 7
 8
 9
10
11
12
13
14
15
16
17
18
19
20
21
22
|
#!/bin/sh

# If a command fails then the deploy stops
set -e

printf "\033[0;32mDeploying updates to GitHub...\033[0m\n"

# Build the project.
hugo # if using a theme, replace with `hugo -t <YOURTHEME>`

# Add changes to git.
git add .

# Commit changes.
msg="rebuilding site $(date)"
if [ -n "$*" ]; then
	msg="$*"
fi
git commit -m "$msg"

# Push source and build repos.
git push origin master
|
SEO必備 sitemap.xml
主題大部分都會做好sitemap.xml設定,輸出Hugo看public資料夾有沒有sitemap.xml,
路徑:http://localhost:1313/sitemap.xml
到search.google.com設定你的sitemap讓google可以爬取你的網站
新增sitemap.xml方法
gohugo.io/templates/sitemap-template
yaml轉換toml
官方文檔有的只有yaml,很多主題都使用toml做設定,需要將yaml轉toml才可以設定成功。
轉換工具
toolkit.site/format.html
撰寫文章工具
選擇什麼軟體來寫文章,推薦使用vs code並搭配Markdown Preview Enhanced外掛
使用指令hugo server檢查文章
線上撰寫netlifycms是很強大的一款系統,是完全開源,能將你的Hugo有個後台寫文章、上傳圖片。
可以去看看官方www.netlifycms.org
分類的使用
靜態沒有後台可以查詢已經有哪些分類,所以必須要看一下全部分類的網址來決定要放到哪個分類上。
網址:https://你的網址/categories/
例如:https://aishuafei.com/categories/
把所有超連結新增另開新視窗 blank
建立資料夾結構jquery及jquery_add_blank.html檔案
themes\zzo\layouts\partials\jquery\jquery_add_blank.html
#container div.wrapper main div article p a 需要依你的主題為主去針對元素選取 Chrome按下F12可以查看
輸入
 1
 2
 3
 4
 5
 6
 7
 8
 9
10
11
12
13
|
<script src="https://code.jquery.com/jquery-3.5.0.min.js"></script>
<script>
$(document).ready(function(){
  $('#container div.wrapper main div article p a').attr('target', '_blank');
    $('#container > div.wrapper > main > div > article > ul > li > ul > li > a').attr('target', '_blank');
});

var links = document.links;
// jQuery
$(document.links).filter(function() {
  return this.hostname != window.location.hostname;
}).attr('target', '_blank');
</script>
|
其他加入_blank方法
編輯 themes\zzo\layouts\_default\single.html
輸入
{{ partial "jquery/jquery_add_blank" . }}
Hugo 常用指令
喧染:hugo server -D -D參數是連草稿也會一起喧染,不管已設定true的草稿。
輸出頁面:hugo
結論
Hugo本身做很多功能已經很足夠,缺點是沒有外掛可以使用,產生頁面快是Hugo的優點。