介紹
Python 有內置函式寄送email方法,介紹兩種方法gmail寄送email,還可以使用gmail api寄email,使用api能避開google帳號登入驗證問題,看看怎麼做。
Python 內置函式的方法
寄email 加 附件
import smtplib
from email.mime.multipart import MIMEMultipart
from email.mime.text import MIMEText
from email.mime.base import MIMEBase
from email import encoders

sender = 'you_sender_email' #寄件帳號
senderpw = 'you_senderpw_pw' #寄件密碼
receive = 'you_receive_email' #收件人
filename_title = 'file標題'
filename = 'omaa.zip' # 附件的路徑
content = '信件內容'


fromaddr = "%s" % sender #寄件人信箱
toaddr = "%s" % receive #收件人

# instance of MIMEMultipart
msg = MIMEMultipart()

# storing the senders email address
msg['From'] = fromaddr

# storing the receivers email address
msg['To'] = toaddr

# storing the subject
msg['Subject'] = "%s" % filename_title  #標題

# string to store the body of the mail
body = "%s" % content

# attach the body with the msg instance
msg.attach(MIMEText(body, 'plain','utf-8'))

# open the file to be sent
attachment = open("%s" % filename, "rb")

# instance of MIMEBase and named as p
p = MIMEBase('application', 'octet-stream')

# To change the payload into encoded form
p.set_payload((attachment).read())

# encode into base64
encoders.encode_base64(p)

p.add_header('Content-Disposition', 'attachment',
                filename=('utf-8', '', "%s" % filename))


# attach the instance 'p' to instance 'msg'
msg.attach(p)

# creates SMTP session
s = smtplib.SMTP('smtp.gmail.com', 587)

# start TLS for security
s.starttls()

# Authentication
s.login(fromaddr, "%s" % senderpw) #寄件人gamil密碼

# Converts the Multipart msg into a string
text = msg.as_string()

# sending the mail
s.sendmail(fromaddr, toaddr, text)

# terminating the session
s.quit()
使用yagmail 庫 寄email
github:https://github.com/kootenpv/yagmail/issues/79
安裝
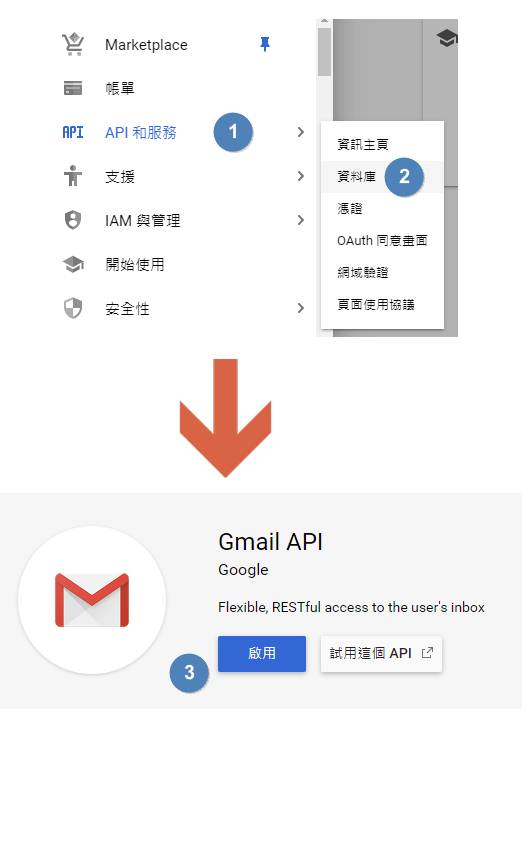
pip install yagmail[all]建立gmail api
請到google api https://console.cloud.google.com/apis/
建立API
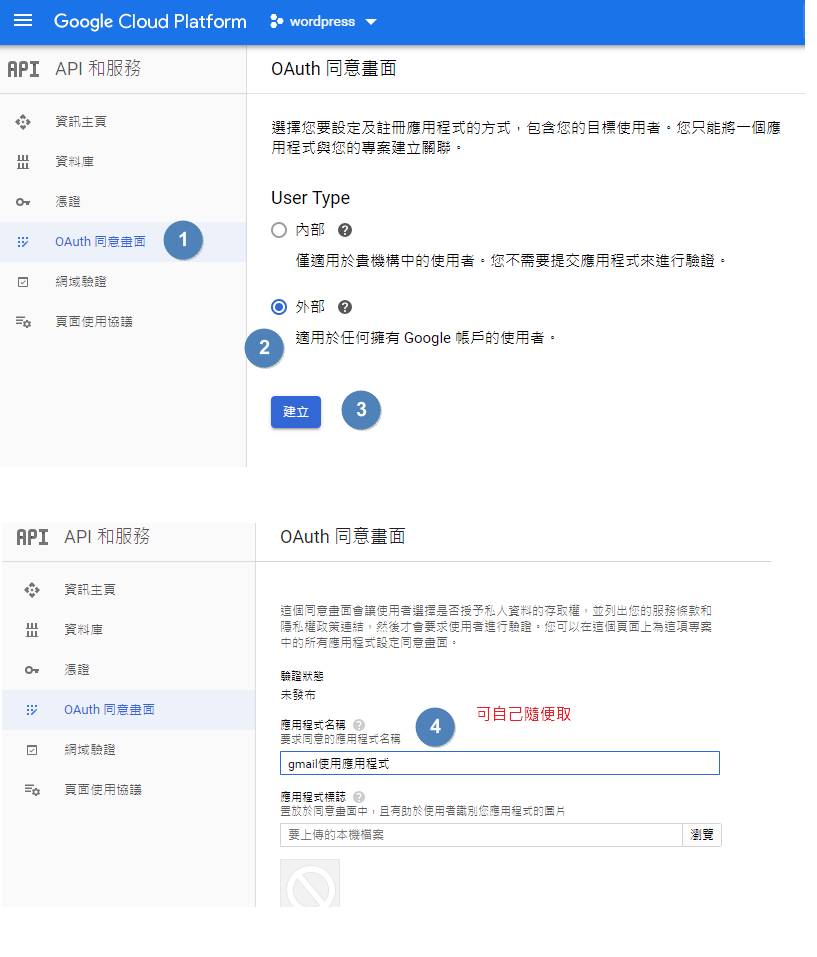
設定OAurth 同意畫面

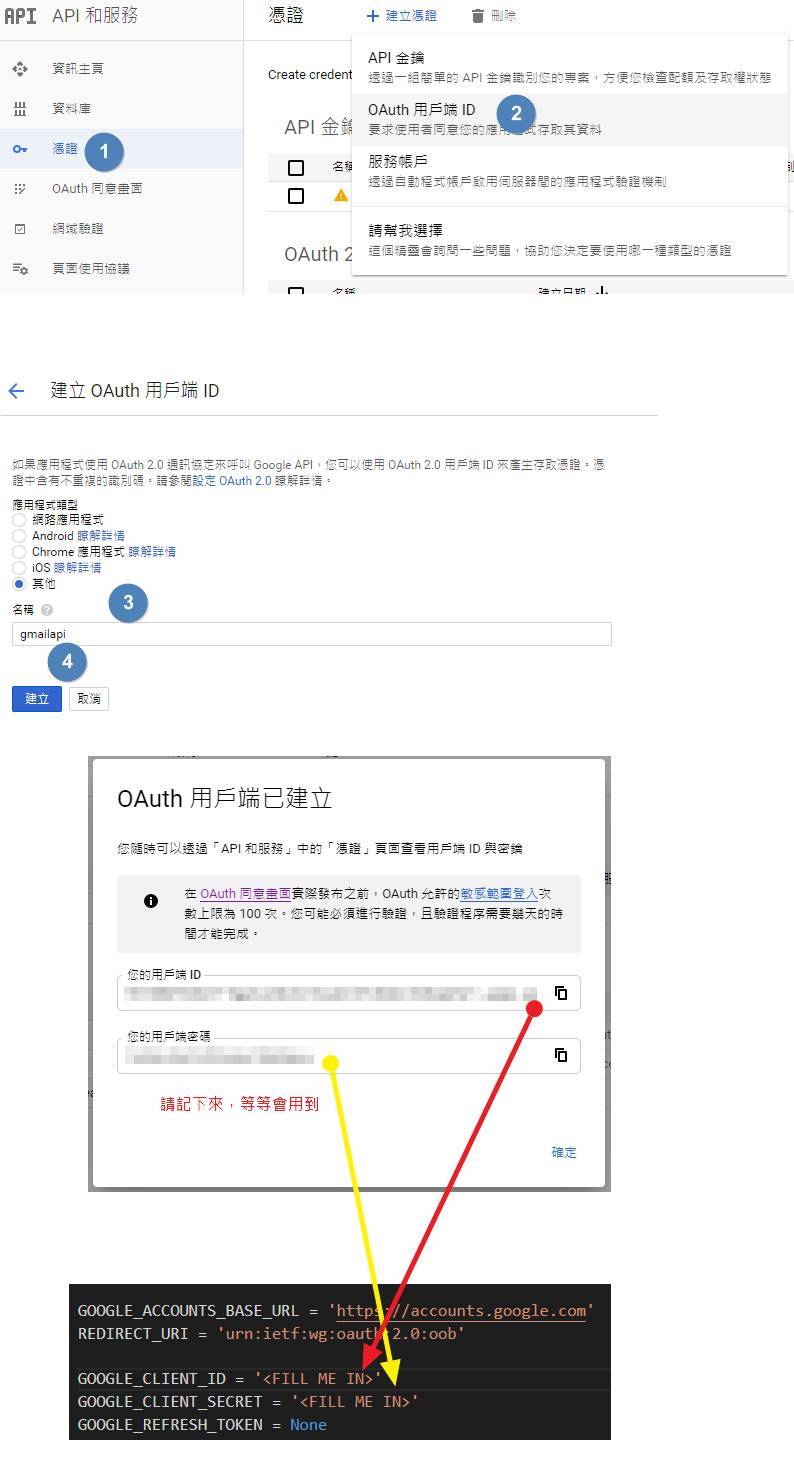
建立憑證 OAuth
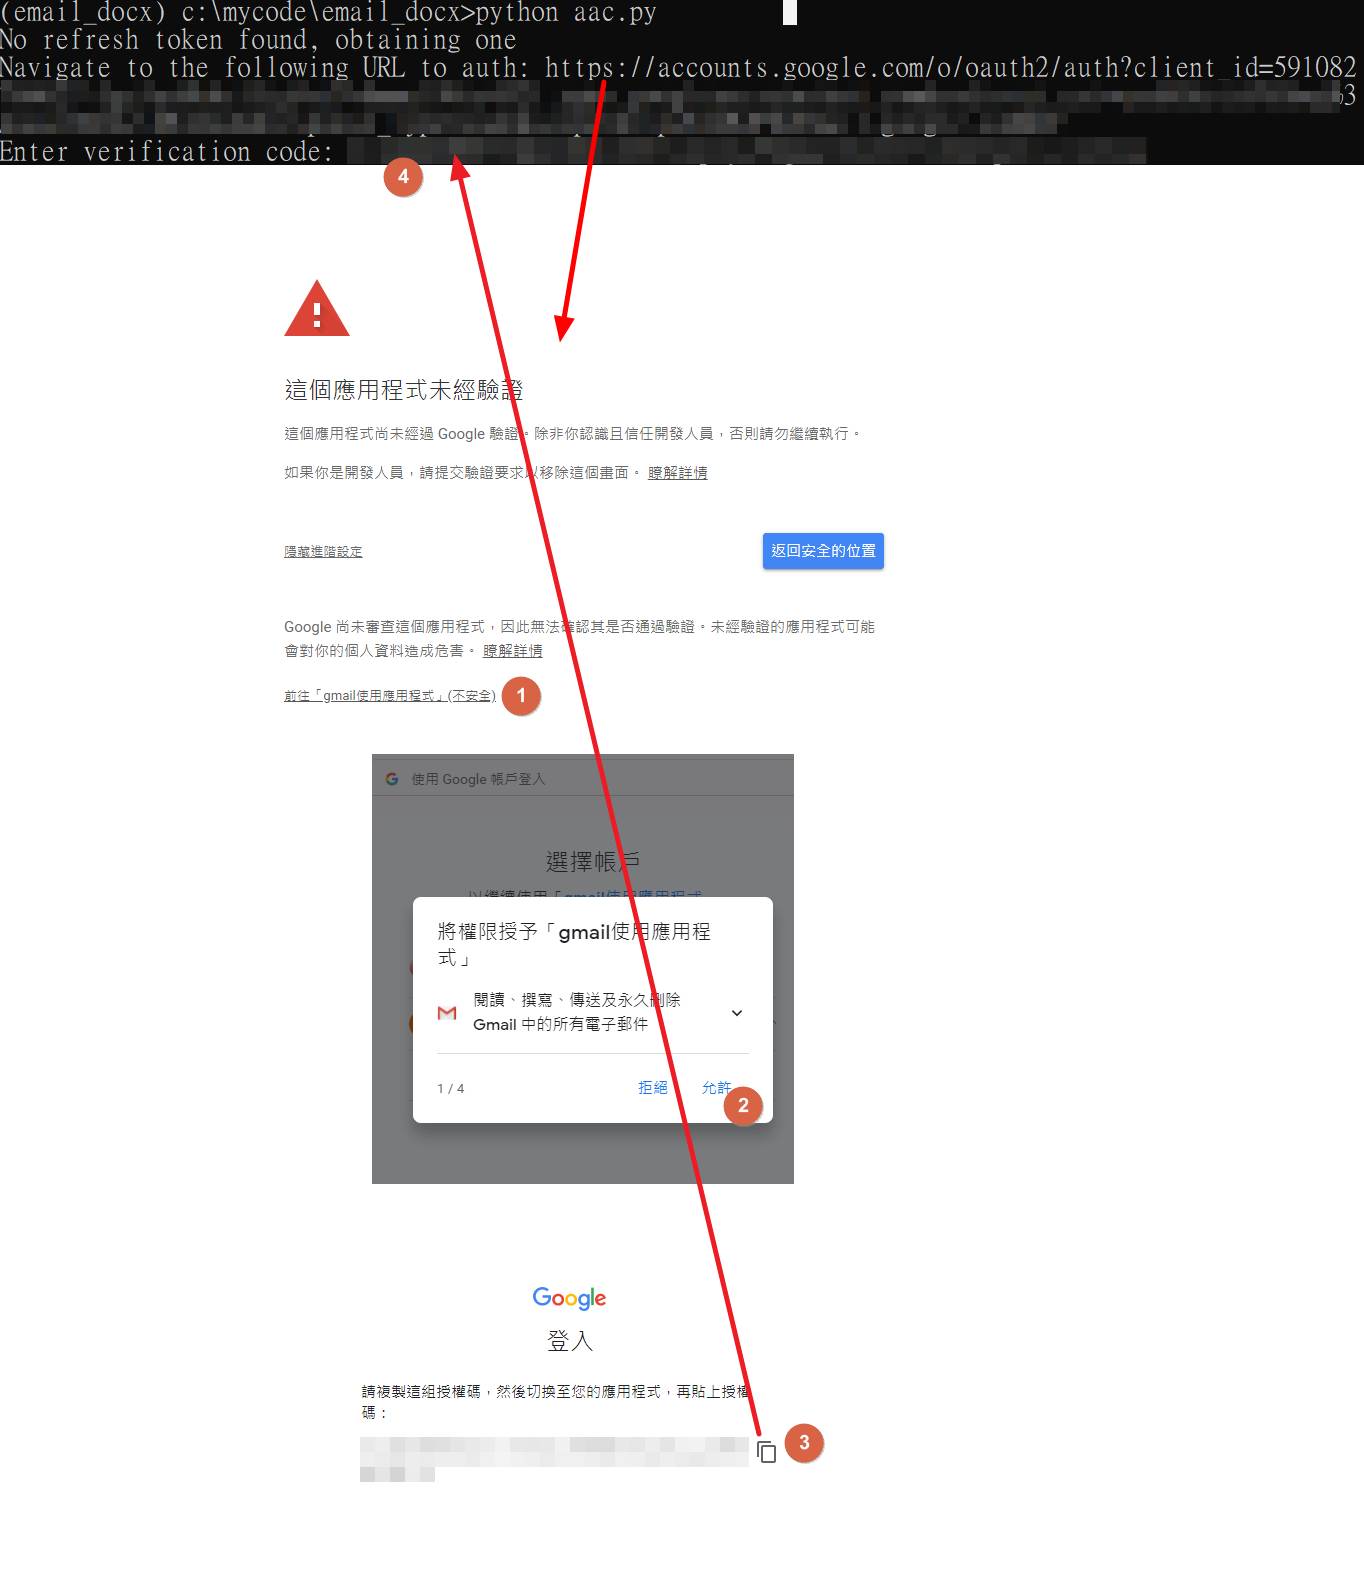
產生OAuth TOKEN 程式碼
"""
Adapted from:
https://github.com/google/gmail-oauth2-tools/blob/master/python/oauth2.py
https://developers.google.com/identity/protocols/OAuth2

1. Generate and authorize an OAuth2 (generate_oauth2_token)
2. Generate a new access tokens using a refresh token(refresh_token)
3. Generate an OAuth2 string to use for login (access_token)
"""

import base64
import imaplib
import json
import smtplib
import urllib.parse
import urllib.request
from email.mime.multipart import MIMEMultipart
from email.mime.text import MIMEText
import lxml.html

GOOGLE_ACCOUNTS_BASE_URL = 'https://accounts.google.com'
REDIRECT_URI = 'urn:ietf:wg:oauth:2.0:oob'

GOOGLE_CLIENT_ID = '<FILL ME IN>' #在這裡輸入
GOOGLE_CLIENT_SECRET = '<FILL ME IN>' #在這裡輸入
GOOGLE_REFRESH_TOKEN = None


def command_to_url(command):
    return '%s/%s' % (GOOGLE_ACCOUNTS_BASE_URL, command)


def url_escape(text):
    return urllib.parse.quote(text, safe='~-._')


def url_unescape(text):
    return urllib.parse.unquote(text)


def url_format_params(params):
    param_fragments = []
    for param in sorted(params.items(), key=lambda x: x[0]):
        param_fragments.append('%s=%s' % (param[0], url_escape(param[1])))
    return '&'.join(param_fragments)


def generate_permission_url(client_id, scope='https://mail.google.com/'):
    params = {}
    params['client_id'] = client_id
    params['redirect_uri'] = REDIRECT_URI
    params['scope'] = scope
    params['response_type'] = 'code'
    return '%s?%s' % (command_to_url('o/oauth2/auth'), url_format_params(params))


def call_authorize_tokens(client_id, client_secret, authorization_code):
    params = {}
    params['client_id'] = client_id
    params['client_secret'] = client_secret
    params['code'] = authorization_code
    params['redirect_uri'] = REDIRECT_URI
    params['grant_type'] = 'authorization_code'
    request_url = command_to_url('o/oauth2/token')
    response = urllib.request.urlopen(request_url, urllib.parse.urlencode(params).encode('UTF-8')).read().decode('UTF-8')
    return json.loads(response)


def call_refresh_token(client_id, client_secret, refresh_token):
    params = {}
    params['client_id'] = client_id
    params['client_secret'] = client_secret
    params['refresh_token'] = refresh_token
    params['grant_type'] = 'refresh_token'
    request_url = command_to_url('o/oauth2/token')
    response = urllib.request.urlopen(request_url, urllib.parse.urlencode(params).encode('UTF-8')).read().decode('UTF-8')
    return json.loads(response)


def generate_oauth2_string(username, access_token, as_base64=False):
    auth_string = 'user=%s\1auth=Bearer %s\1\1' % (username, access_token)
    if as_base64:
        auth_string = base64.b64encode(auth_string.encode('ascii')).decode('ascii')
    return auth_string


def test_imap(user, auth_string):
    imap_conn = imaplib.IMAP4_SSL('imap.gmail.com')
    imap_conn.debug = 4
    imap_conn.authenticate('XOAUTH2', lambda x: auth_string)
    imap_conn.select('INBOX')


def test_smpt(user, base64_auth_string):
    smtp_conn = smtplib.SMTP('smtp.gmail.com', 587)
    smtp_conn.set_debuglevel(True)
    smtp_conn.ehlo('test')
    smtp_conn.starttls()
    smtp_conn.docmd('AUTH', 'XOAUTH2 ' + base64_auth_string)


def get_authorization(google_client_id, google_client_secret):
    scope = "https://mail.google.com/"
    print('Navigate to the following URL to auth:', generate_permission_url(google_client_id, scope))
    authorization_code = input('Enter verification code: ')
    response = call_authorize_tokens(google_client_id, google_client_secret, authorization_code)
    return response['refresh_token'], response['access_token'], response['expires_in']


def refresh_authorization(google_client_id, google_client_secret, refresh_token):
    response = call_refresh_token(google_client_id, google_client_secret, refresh_token)
    return response['access_token'], response['expires_in']


def send_mail(fromaddr, toaddr, subject, message):
    access_token, expires_in = refresh_authorization(GOOGLE_CLIENT_ID, GOOGLE_CLIENT_SECRET, GOOGLE_REFRESH_TOKEN)
    auth_string = generate_oauth2_string(fromaddr, access_token, as_base64=True)

    msg = MIMEMultipart('related')
    msg['Subject'] = subject
    msg['From'] = fromaddr
    msg['To'] = toaddr
    msg.preamble = 'This is a multi-part message in MIME format.'
    msg_alternative = MIMEMultipart('alternative')
    msg.attach(msg_alternative)
    part_text = MIMEText(lxml.html.fromstring(message).text_content().encode('utf-8'), 'plain', _charset='utf-8')
    part_html = MIMEText(message.encode('utf-8'), 'html', _charset='utf-8')
    msg_alternative.attach(part_text)
    msg_alternative.attach(part_html)
    server = smtplib.SMTP('smtp.gmail.com:587')
    server.ehlo(GOOGLE_CLIENT_ID)
    server.starttls()
    server.docmd('AUTH', 'XOAUTH2 ' + auth_string)
    server.sendmail(fromaddr, toaddr, msg.as_string())
    server.quit()


if __name__ == '__main__':
    if GOOGLE_REFRESH_TOKEN is None:
        print('No refresh token found, obtaining one')
        refresh_token, access_token, expires_in = get_authorization(GOOGLE_CLIENT_ID, GOOGLE_CLIENT_SECRET)
        print('Set the following as your GOOGLE_REFRESH_TOKEN:', refresh_token)
        exit()

    send_mail('[email protected]', '[email protected]',
              'A mail from you from Python',
              '<b>A mail from you from Python</b><br><br>' +
              'So happy to hear from you!')
TOKEN使用方法
將你的ID、SECRET 輸入到上方的腳本並執行python 腳本,進入產生的網址,依照圖步驟走下去。
json檔設定
重點在這,建立一個json檔,設定取得的三大key,id、secret、token。
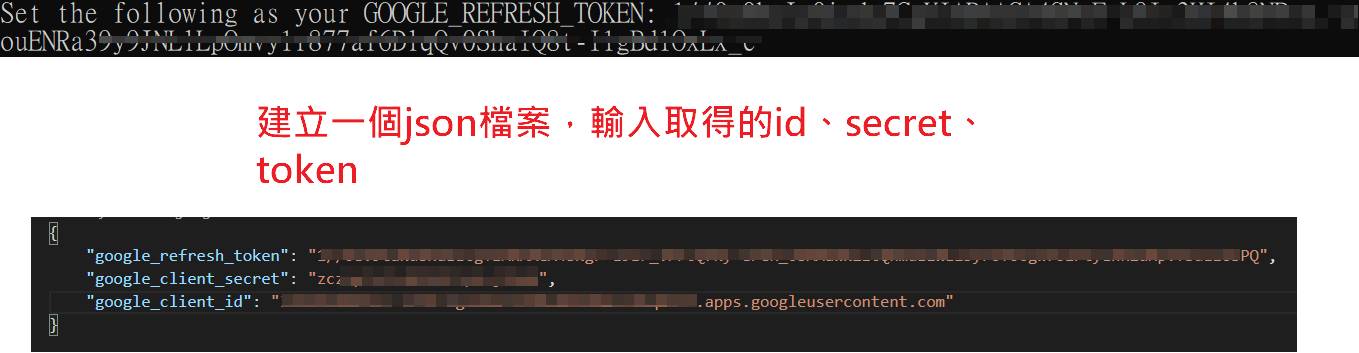
{
    "google_refresh_token": "在此輸入",
    "google_client_secret": "在此輸入",
    "google_client_id": "在此輸入"
}
不到10行就可以寫出gmail寄email
import yagmail

file = ['runtime.txt', 'debug.log'] #傳送多個檔案 以list型態
yag = yagmail.SMTP("[email protected]", oauth2_file="client_secret.json")
yag.send(
    to="[email protected]", subject="標題", #to = "收件人信箱" 需傳送多個 使用list ['[email protected]', '[email protected]']
    contents="內容",
    attachments= file
    )
yagmail 更多使用方法你可以到
參考文章:https://blog.macuyiko.com/post/2016/how-to-send-html-mails-with-oauth2-and-gmail-in-python.html