介紹
GD-Utils 是使用javascript寫的一個google dirve搬資料,GD-Utils是個很強的工具,drive搬資料速度非常快,搭配telegram bot只要有手機就能搬資料非常方便,主要用於突破每日750GB流量限制,GD-Utils速度快是優點
取得team drive(團隊盤)
GD-Utils 教學
必備sa、建立SA帳號
至少要100個以上的SA才可以玩玩GD-Utils,請看這篇文章前置安裝
記得一定要將SA加入到team drive(團隊盤)
更新Ubuntu
更新軟體的最新資訊及列表、更新目前已安裝的軟體到最新版本
1
2
|
sudo apt-get update
sudo apt-get upgrade
|
安裝 nodejs
使用版本 Node.js v12.x
1
2
|
curl -sL https://deb.nodesource.com/setup_12.x | sudo -E bash -
sudo apt-get install -y nodejs
|
無法使用curl請安裝curl
1
|
git clone https://github.com/dissipator/gd-utils.git && cd gd-utils
|
執行 npm install --unsafe-perm=true --allow-root 安裝依賴
如果在安裝過程中發生報錯,請切換nodejs版本到v12再試。如果報錯信息裡有Error: not found: make之類的消息,說明你的命令行環境缺少make命令,可參考這裡或直接google搜索Make Command Not Found
如果報錯信息裡有 better-sqlite3,先執行 npm config set unsafe-perm=true 然後 rm -rf node_module 刪掉依賴目錄,最後再執行下npm i安裝試試。
依賴安裝完成後,項目文件夾下會多出個node_modules目錄,請不要刪除它,接下來進行下一步配置。
上傳SA帳號
SA檔案必須放在sa資料夾內
提供一些SSH上傳方法,如果不太了解的話,請google SSH上傳檔案
-
可使用 MobaXterm
-
Ubuntu 作業系統
安裝 SSH(Secure Shell) 服務以提供遠端管理服務
1
|
sudo apt-get install ssh
|
SSH 遠端登入 Ubuntu 伺服器
將 檔案/資料夾 從遠端 Ubuntu 伺服器拷至本地(scp)
將 檔案/資料夾 從本地拷至遠端 Ubuntu 伺服器(scp)
-
docker 方法
查詢正在啟動的container ID
1
2
3
4
5
|
docker ps
CONTAINER ID        IMAGE               COMMAND             CREATED             STATUS              PORTS
          NAMES
22644f43d3a1        ubuntu              "bash"              3 days ago          Up 2 hours
          condescending_elgamal
|
複製到docker container
docker cp foo.txt mycontainer:/foo.txt
例子
docker cp foo.txt 22644f43d3a1:/foo.txt
也可以是資料夾,或是將SA壓縮成一個zip在使用unzip解壓縮壓
安裝unzip
sudo apt-get install -y unzip
建立telegram bot
請先註冊Telegram及安裝telegram
加入 官方bot 輸入指令建立個人的BOT,https://t.me/botfather
1
2
3
|
Alright, a new bot. How are we going to call it? Please choose a name for your bot.
輸入機器人名稱
|
像是下面的545868882:AAhhEhthrh_t_sferergregerreh 就是token,等等會需要用到
1
2
3
4
5
6
7
|
Done! Congratulations on your new bot. You will find it at t.me/godmike_bot. You can now add a description, about section and profile picture for your bot, see /help for a list of commands. By the way, when you've finished creating your cool bot, ping our Bot Support if you want a better username for it. Just make sure the bot is fully operational before you do this.
Use this token to access the HTTP API:
545868882:AAhhEhthrh_t_sferergregerreh
Keep your token secure and store it safely, it can be used by anyone to control your bot.
For a description of the Bot API, see this page: https://core.telegram.org/bots/api
|
取得telegram個人ID
現在要取得個人ID,需要用到bot的 token
對你機器人隨便輸入一個訊息
取得ID,{token}改成bot的token
https://api.telegram.org/bot{token}/getUpdates
例如,在瀏覽器輸入網址
https://api.telegram.org/bot545868882:AAhhEhthrh_t_sferergregerreh/getUpdates
“id”:10583568111 是你個人的ID
1
2
|
{"ok":true,"result":[{"update_id":542110182,
"message":{"message_id":115,"from":{"id":10583568111,"is_bot":false,"first_name":"Mike","language_code":"en"},"chat":{"id":1058356111,"first_name":"Mike","type":"private"},"date":1598359155,"text":"teee"}}]}
|
安裝Rclone
-
ubtuntu
1
|
curl https://rclone.org/install.sh | sudo bash
|
-
windows10
下載:https://rclone.org/downloads/ ,選擇妳的作業系統
啟動環境變數
快捷鍵:win + R
輸入:rundll32.exe sysdm.cpl,EditEnvironmentVariables
加入,依照你放的路徑為主
C:\rclone-v1.52.2-windows-amd64
開啟命令列輸入 rclone -h,若有跑出訊息就是安裝成功
建立 remote
主要是取得 refresh_token、client_id、client_secret
client_id、client_secret 建議使用自己的api,https://console.developers.google.com/?hl=zh-tw
輸入 rclone config
1
2
3
4
5
6
7
8
9
10
11
12
13
14
15
16
17
18
19
20
21
22
23
24
25
26
27
28
29
30
31
32
33
34
35
36
37
38
39
40
41
42
43
44
45
46
47
48
49
50
51
52
53
54
55
56
57
58
59
60
61
62
63
64
65
66
67
68
69
70
71
72
73
74
75
76
77
78
79
80
81
82
83
84
85
86
87
88
89
90
91
92
93
94
95
96
97
98
99
100
101
102
103
104
105
106
107
108
109
110
111
112
113
114
115
116
117
118
119
120
121
122
123
124
125
126
127
128
129
130
131
132
133
134
135
136
137
138
139
140
141
142
143
144
145
146
147
148
149
150
151
152
153
154
155
|
root@22644f43d3a1:/# rclone config
2020/08/25 21:05:21 NOTICE: Config file "/root/.config/rclone/rclone.conf" not found - using defaults
No remotes found - make a new one
n) New remote
s) Set configuration password
q) Quit config
n/s/q> n
name> test #隨意取名稱
Type of storage to configure.
Enter a string value. Press Enter for the default ("").
Choose a number from below, or type in your own value
1 / 1Fichier
\ "fichier"
2 / Alias for an existing remote
\ "alias"
3 / Amazon Drive
\ "amazon cloud drive"
4 / Amazon S3 Compliant Storage Provider (AWS, Alibaba, Ceph, Digital Ocean, Dreamhost, IBM COS, Minio, etc)
\ "s3"
5 / Backblaze B2
\ "b2"
6 / Box
\ "box"
7 / Cache a remote
\ "cache"
8 / Citrix Sharefile
\ "sharefile"
9 / Dropbox
\ "dropbox"
10 / Encrypt/Decrypt a remote
\ "crypt"
11 / FTP Connection
\ "ftp"
12 / Google Cloud Storage (this is not Google Drive)
\ "google cloud storage"
13 / Google Drive
\ "drive"
14 / Google Photos
\ "google photos"
15 / Hubic
\ "hubic"
16 / In memory object storage system.
\ "memory"
17 / Jottacloud
\ "jottacloud"
18 / Koofr
\ "koofr"
19 / Local Disk
\ "local"
20 / Mail.ru Cloud
\ "mailru"
21 / Mega
\ "mega"
22 / Microsoft Azure Blob Storage
\ "azureblob"
23 / Microsoft OneDrive
\ "onedrive"
24 / OpenDrive
\ "opendrive"
25 / OpenStack Swift (Rackspace Cloud Files, Memset Memstore, OVH)
\ "swift"
26 / Pcloud
\ "pcloud"
27 / Put.io
\ "putio"
28 / QingCloud Object Storage
\ "qingstor"
29 / SSH/SFTP Connection
\ "sftp"
30 / Sugarsync
\ "sugarsync"
31 / Tardigrade Decentralized Cloud Storage
\ "tardigrade"
32 / Transparently chunk/split large files
\ "chunker"
33 / Union merges the contents of several upstream fs
\ "union"
34 / Webdav
\ "webdav"
35 / Yandex Disk
\ "yandex"
36 / http Connection
\ "http"
37 / premiumize.me
\ "premiumizeme"
38 / seafile
\ "seafile"
Storage> 13 #輸入13
** See help for drive backend at: https://rclone.org/drive/ **
Google Application Client Id
Setting your own is recommended.
See https://rclone.org/drive/#making-your-own-client-id for how to create your own.
If you leave this blank, it will use an internal key which is low performance.
Enter a string value. Press Enter for the default (""). #如果不使用自己的留空白
client_id> 5574454-55775npcb.apps.googleusercontent.com
Google Application Client Secret
Setting your own is recommended.
Enter a string value. Press Enter for the default (""). #如果不使用自己的留空白
client_secret> eMo572752727-IG-M
Scope that rclone should use when requesting access from drive.
Enter a string value. Press Enter for the default ("").
Choose a number from below, or type in your own value
1 / Full access all files, excluding Application Data Folder.
\ "drive"
2 / Read-only access to file metadata and file contents.
\ "drive.readonly"
/ Access to files created by rclone only.
3 | These are visible in the drive website.
| File authorization is revoked when the user deauthorizes the app.
\ "drive.file"
/ Allows read and write access to the Application Data folder.
4 | This is not visible in the drive website.
\ "drive.appfolder"
/ Allows read-only access to file metadata but
5 | does not allow any access to read or download file content.
\ "drive.metadata.readonly"
scope> 1 #輸入 1
ID of the root folder
Leave blank normally.
Fill in to access "Computers" folders (see docs), or for rclone to use
a non root folder as its starting point.
Enter a string value. Press Enter for the default ("").
root_folder_id>
Service Account Credentials JSON file path
Leave blank normally.
Needed only if you want use SA instead of interactive login.
Enter a string value. Press Enter for the default ("").
service_account_file>
Edit advanced config? (y/n) # 輸入n
y) Yes
n) No (default)
y/n> n
Remote config
Use auto config? # 本機上才使用Y,其他都是輸入N,docker上也是輸入N
* Say Y if not sure
* Say N if you are working on a remote or headless machine
y) Yes (default)
n) No
y/n> n
#開啟顯示的網址,取得CODE 並輸入CODE
Please go to the following link: https://accounts.google.com/o/oauth2/auth?access_type=offline&client_id=11154155-lg9444408r8lfs3npcb.apps.googleusercontent.com&redirect_uri=urn%3Aietf%3Awg%3Aoauth%3A2.0%3Aoob&response_type=code&scope=https%3A%2F%2Fwww.googleapis.com%2Fauth%2Fdrive&state=0ZZwe6666KLCQ Log in and authorize rclone for access
Enter verification code> 4/3QHK2u1YfZ8x45rVq518LiCURbxldh9FzGO72Xq74N_r_wX-V2moGjM
Configure this as a team drive? # 使用團隊盤
y) Yes
n) No (default)
y/n> y
Fetching team drive list...
Choose a number from below, or type in your own value
1 / share_gogogo
\ "0AL9kUqtQlodwUk9PVA"
Enter a Team Drive ID> 1 # 選擇團隊盤
|
- 查看設定檔
cat /root/.config/rclone/rclone.conf
取得client_id、client_secret、refresh_token” 這三個就可以了
設定config.js
編輯config.js
輸入
nano config.js
- 只需要新增修改以下
- client_id
- client_secret
- refresh_token
- tg_token bot的token
- adminUsers 個人的ID
- DEFAULT_TARGET team dirve ID(團隊盤ID)
- 開啟網頁進入團隊盤
https://drive.google.com/drive/folders/0AL9kUqtQlodwCC9PVX , 0AL9kUqtQlodwCC9PVX就是ID
1
2
3
4
5
6
7
8
9
10
11
12
13
14
15
16
17
18
19
20
21
22
23
24
25
|
// 單次請求多少毫秒未響應以後超時(基準值,若連續超時則下次調整為上次的2倍)
const TIMEOUT_BASE = 7000
// 最大超時設置,比如某次請求,第一次7s超時,第二次14s,第三次28s,第四次56s,第五次不是112s而是60s,後續同理
const TIMEOUT_MAX = 60000
const LOG_DELAY = 5000 //日誌輸出時間間隔,單位毫秒
const PAGE_SIZE = 1000 //每次網絡請求讀取目錄下的文件數,數值越大,越有可能超時,不得超過1000
const RETRY_LIMIT = 5 //如果某次請求失敗,允許其重試的最大次數
const PARALLEL_LIMIT = 10 //網絡請求的並行數量,可根據網絡環境調整
const DEFAULT_TARGET = 'DEFAULT_TARGET' //必填,拷貝默認目的地ID,如果不指定target,則會復製到此處,建議填寫團隊盤ID
const AUTH = { //如果您擁有service account的json授權文件,可將其拷貝至sa目錄中以代替client_id/secret/refrest_token
client_id : 'your_client_id' ,
client_secret : 'your_client_secret' ,
refresh_token : 'your_refrest_token' ,
expires : 0 , //可以留空
access_token : '' , //可以留空
tg_token : 'bot_token' , //你的telegram robot的token,獲取方法參見https://core.telegram.org/bots#6-botfather
tg_whitelist : [ 'tg_whitelist' ] , //你的tg username(t.me/username),bot只會執行這個列表裡的用戶所發送的指令
adminUsers : [ your_tg_userid ] //admin users' telegram id, should be numbers
}
module . exports = { AUTH , PARALLEL_LIMIT , RETRY_LIMIT , TIMEOUT_BASE , TIMEOUT_MAX , LOG_DELAY , PAGE_SIZE , DEFAULT_TARGET } ;
|
測試SA讀取權限,確保SA都有讀取權限(重要)
GD-Utils轉存時不會去驗證sa是否有效,要使用腳本將有效的sa保留下來,作者寫一個檢查每個sa將有效的及無效的分開,非常方便的一個腳本
安裝PM2及執行腳本
安裝PM2
執行 server.js腳本
1
|
pm2 start server.js --node-args="--max-old-space-size=1024"
|
運行後會在服務器上監聽23333端口。
想看日誌,執行 pm2 logs
查看pm2 守護的進程列表,執行 pm2 l
停止運行中的進程,執行 pm2 stop 對應的進程名稱
啟動telegram bot
需要常駐bot所以使用pm2 執行 index.js
開始玩轉drive 使用bot執行
輸入 /help 可取得說明
 1
 2
 3
 4
 5
 6
 7
 8
 9
10
11
12
13
14
15
16
17
18
19
20
21
22
23
24
25
26
27
28
|
[使用帮助]
命令 | 说明
=====================
/help | 返回本条使用说明
=====================
/count shareID [-u] | 返回sourceID的文件统计信息
sourceID可以是google drive分享网址本身,也可以是分享ID。如果命令最后加上 -u,则无视之前的记录强制从线上获取,适合一段时候后才更新完毕的分享链接。
=====================
/copy sourceID targetID [-u] | 将sourceID的文件复制到targetID里(会新建一个文件夹)
若不填targetID,则会复制到默认位置(在config.js里设置)。
如果设置了bookmark,那么targetID可以是bookmark的别名。
如果命令最后加上 -u,则无视本地缓存强制从线上获取源文件夹信息。
命令开始执行后会回复此次任务的taskID。
=====================
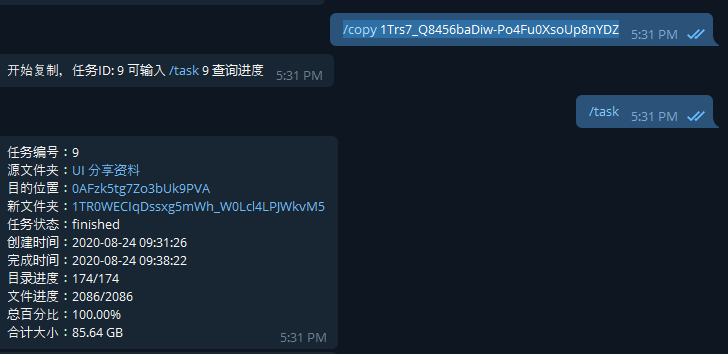
/task | 返回对应任务的进度信息
用例:
/task | 返回所有正在运行的任务详情
/task 7 | 返回编号为 7 的任务详情
/task all | 返回所有任务记录列表
/task clear | 清除所有状态为已完成的任务记录
/task rm 7 | 删除编号为 7 的任务记录
=====================
/bm [action] [alias] [target] | bookmark,添加常用目的文件夹ID
会在输入网址后返回的「文件统计」「开始复制」这两个按钮的下方出现,方便复制到常用位置。
用例:
/bm | 返回所有设置的收藏夹
/bm set movie folder-id | 将folder-id添加到收藏夹,别名设为movie
/bm unset movie | 删除此收藏夹
|
- 使用
- 如果不指定目的的團隊盤 只需輸入要轉存的ID即可
/copy 1Trs7_Q8456baDiw-Po4Fu0XsoUp8nYDZ
- 查看正在執行的任務
- 介紹的有些凌亂,建議可以看看參考資料教學
參考資料