介紹
google drive 需要大量的複製備份到另一個雲端硬碟,例如有A:Team Drive(共享雲端硬碟)複製到B:Team Drive(共享雲端硬碟),使用Autorclone及gclone工具,以本機Windows 10做為測試,如果是中國大陸使用者需要掛VPN,此教學即使不董程式也可以學會Auto rclone + gclone安裝及設定。
-
名詞
- Team Drive = 共享雲端硬碟 = 團隊盤
- Autorclone:利用google-api 建立多個帳號(service accounts) 一個projec建立100個帳號(service accounts),Autorclone也可以copy資料
- gclone:copy資料使用及rclone所有功能
- rclone:可掛載雲端硬碟,上傳,下載,更多功能..,請到官方看看
- service accounts,簡稱sa:用來突破單日帳號限制750GB流量
-
每日上傳檔案數量上限
- 個別使用者每天只能在「我的雲端硬碟」和所有共用雲端硬碟上傳 750 GB 的檔案。當使用者達到 750 GB 的上限或上傳大於 750 GB 的單一檔案,當天就無法再上傳其他檔案,不過上傳中的檔案仍可以完成上傳。可以上傳或同步處理的個別檔案大小上限則為 5 TB。
-
取得無限空間帳號
如果是教育或企業帳號可以選擇共享資料夾或是共享硬碟,如果是一般帳號只有15GB容量必須使用共享硬碟(團隊盤)
台灣大學專校都已經使用G Suite 教育版,想要使用google教育帳號可以去自己學校網站看看,只要學校信箱是google gmail就可以使用google任何服務,共享雲端硬碟要看G Suite管理員有沒有開放權限使用,也可以使用教育帳號個人雲端,因為教育帳號已經是無限空間了,所以教育帳號使用共享雲端硬碟就不是很重要了。
-
其他取得方法可以到蝦皮、露天拍賣網站上看看 搜尋 google教育(請不要買純新增共享雲端硬碟的這是很浪費錢的(找認識的朋友幫妳新增一個共享雲端硬碟或是往下看取得免費共享雲端硬碟),請購買google教育帳號,企業帳號也不要買萬一賣家不在付費G Suite也等於無限空間失效),以上個人的分析
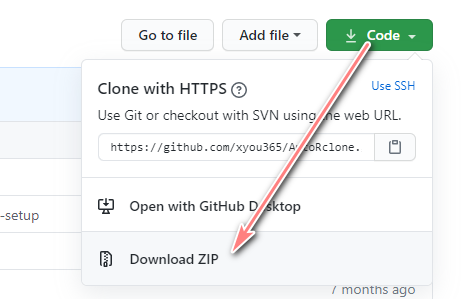
取得免費的Team Drive 共享雲端硬碟(團隊盤)
不要放重要的資料,建議申請Team Drive使用英文名稱
windows 10
前置安裝及設定
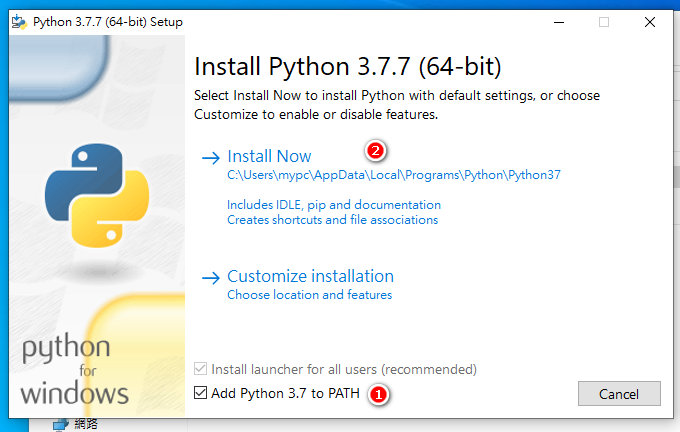
安裝python 3
PATH打勾 加入到環境變數,選擇 Install Now,安裝完後就可以了
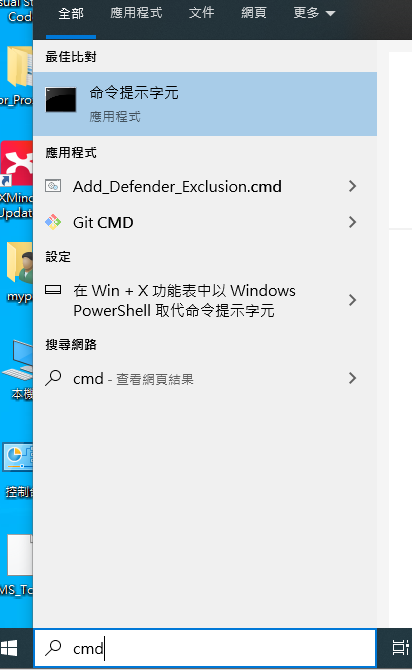
打開 命令列 cmd,可以直接在windows 10 右下搜尋 cmd
輸入 python --version
有版本號代表安裝正常
1
2
|
C:\Users\mypc>python --version
Python 3.7.7
|
安裝gclone
https://github.com/donwa/gclone/releases/tag/v1.51.0-mod1.3.1
解壓縮後會有個gclone.exe 放到你想要的資料夾
放到C:\gclone資料夾內作為示範

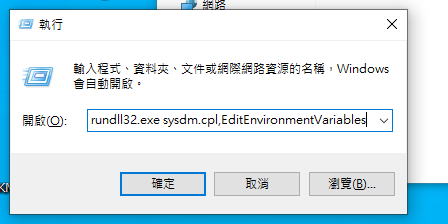
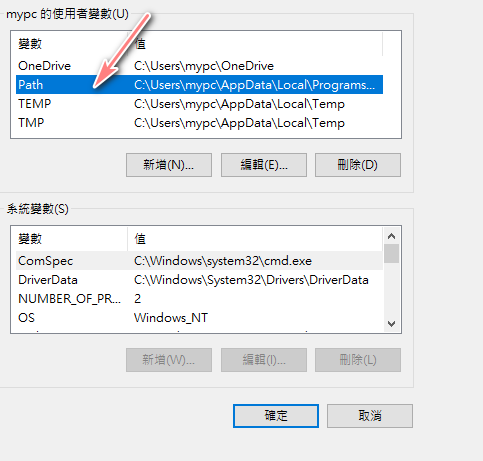
啟動環境變數
快捷鍵:win + R
輸入:rundll32.exe sysdm.cpl,EditEnvironmentVariables
加入gclone到path
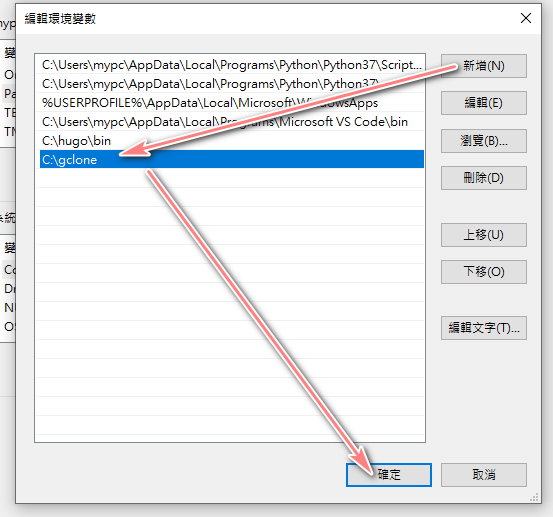
重開打開一個cmd
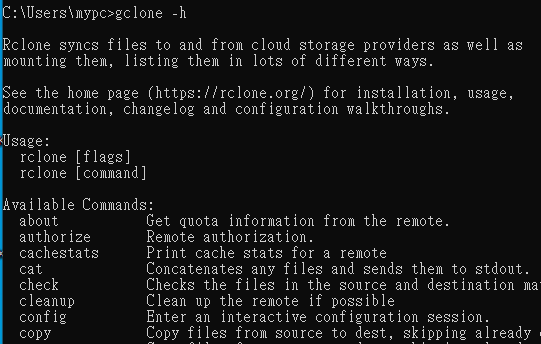
輸入 gclone -h 會列出指令使用說明代表安裝正常
安裝Rclone
與gclone安裝相似
啟動環境變數
快捷鍵:win + R
輸入:rundll32.exe sysdm.cpl,EditEnvironmentVariables
加入,依照你放的路徑為主
C:\rclone-v1.52.2-windows-amd64
開啟命令列輸入 rclone -h,若有跑出訊息就是安裝成功
安裝AutoRclone及設定
將AutoRclone下載的AutoRclone-master.zip檔案解壓縮
開啟cmd
切換到 AutoRclone-master資料夾位置,以你的放置位置為準

輸入,會自動安裝相關的套件
pip install -r requirements.txt
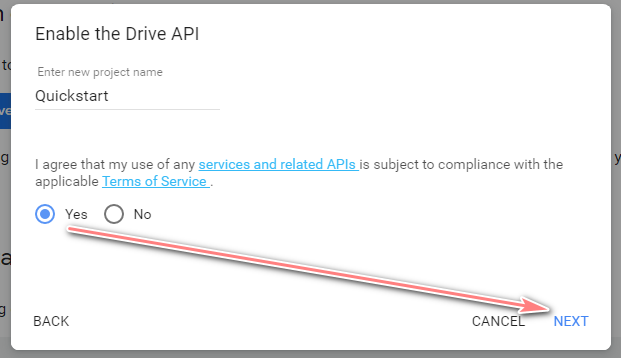
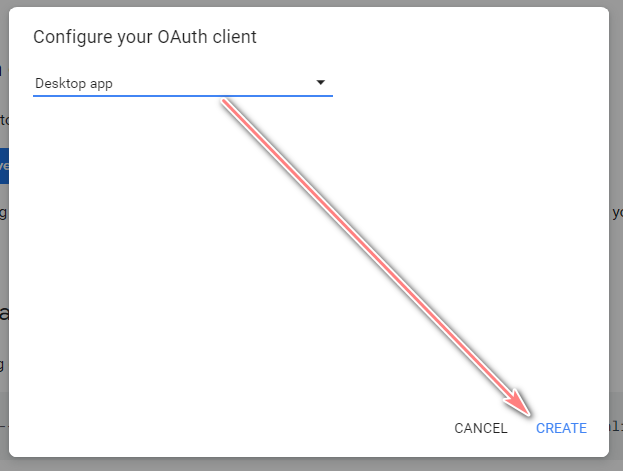
啟用 dirve api
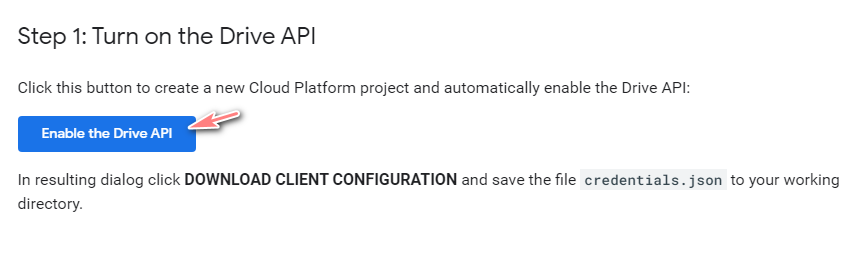
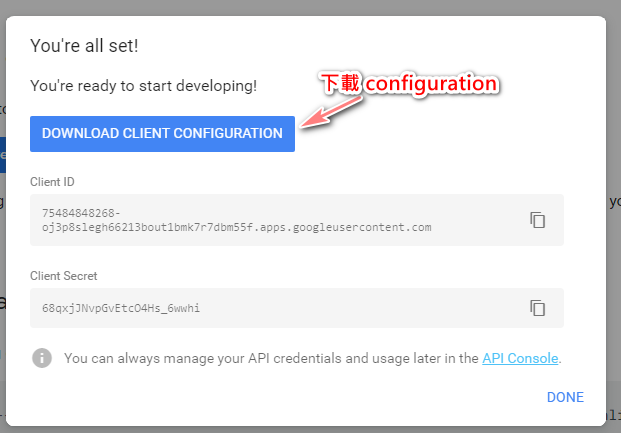
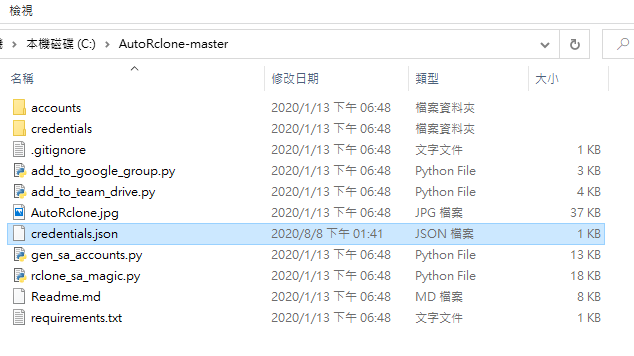
下載後會得到一個credentials.json,請將credentials.json 放入到AutoRclone-master資料夾內
如下
自動建立 service帳號
建立 100個service帳號,每個project 能建立 100個 service 帳號
以指令是建立 6個project 有600個service帳號,計算一下 600 * 750GB = 450,000 GB,建議不要建立太多個project
1
|
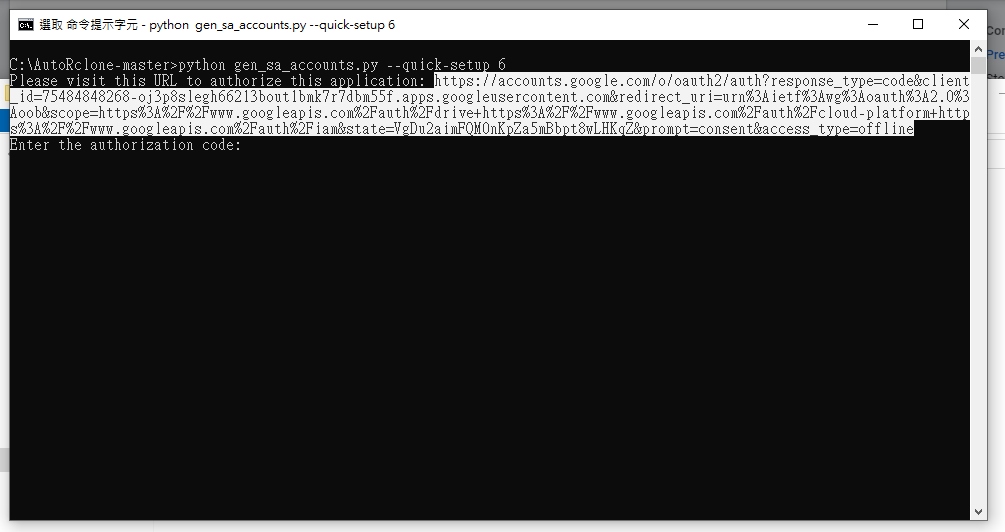
python gen_sa_accounts.py --quick-setup 5
|
- 創建6個項目(項目0到項目5)
- 開啟相關的服務
- 創建600個service accounts(6個項目,每個項目100個)
- 將600個service accounts的授權文件下載到accounts資料夾下面
如果你已經有N個項目,現需要創建新的項目並在新的項目中創建service accounts,直接運行
1
|
python gen_sa_accounts.py --quick-setup 2 --new-only
|
- 額外創建2個項目(項目N+1到項目N+2)
- 開啟相關的服務
- 創建200個service accounts(2個項目,每個項目100個)
- 將200個service accounts的授權文件下載到accounts資料夾下面
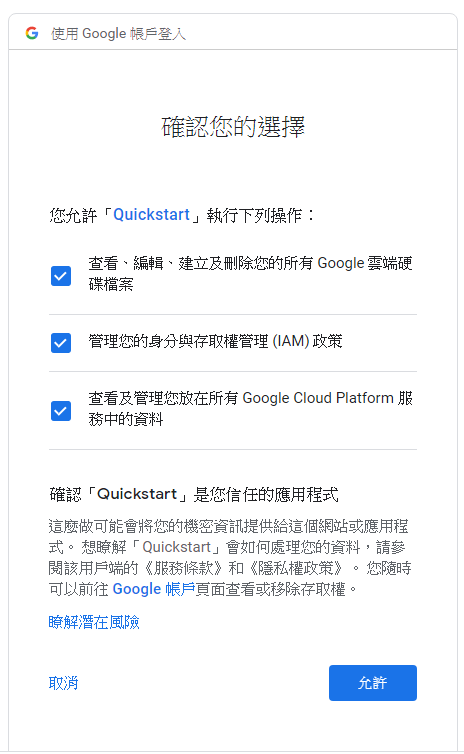
複製產生的網址
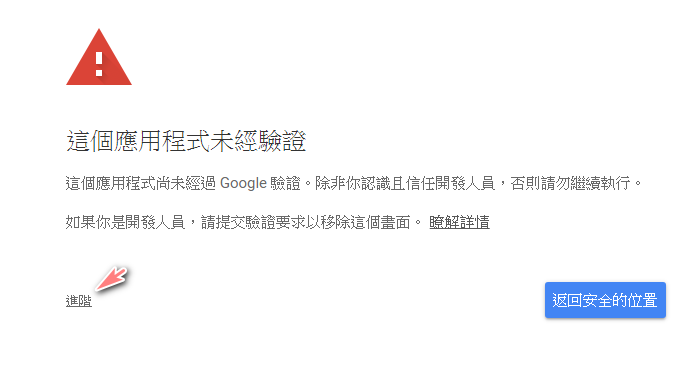
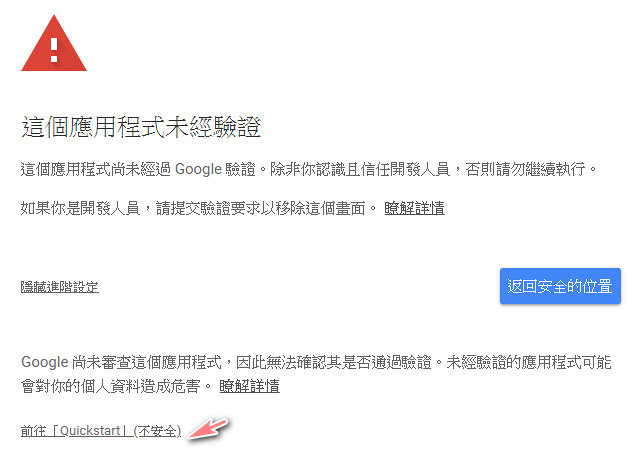
一路按下允許
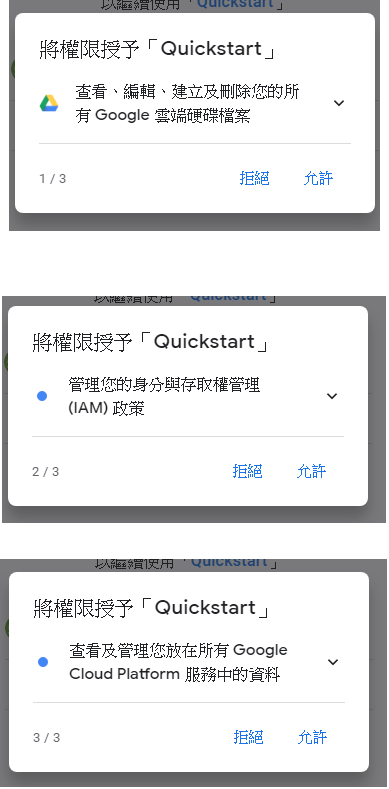
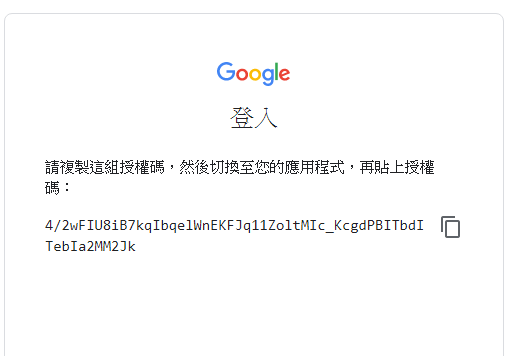
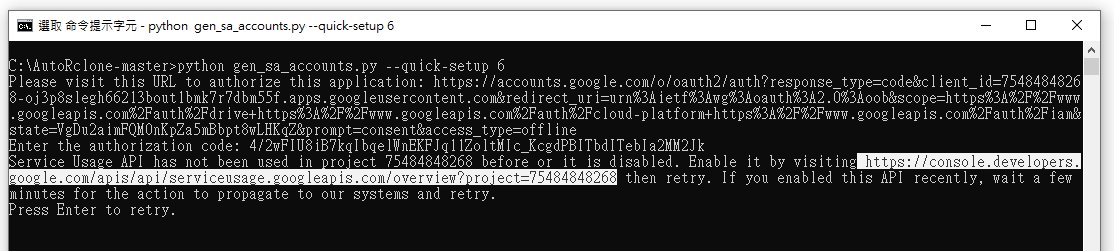
複製授權碼到CMD視窗上,按下ENTER
複製網址,啟用Service Usage API,在回到CMD視窗按下ENTER,會自動開啟建立service帳號

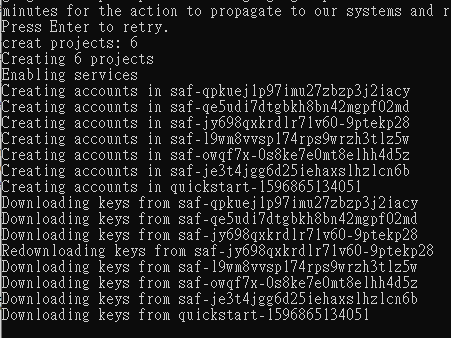
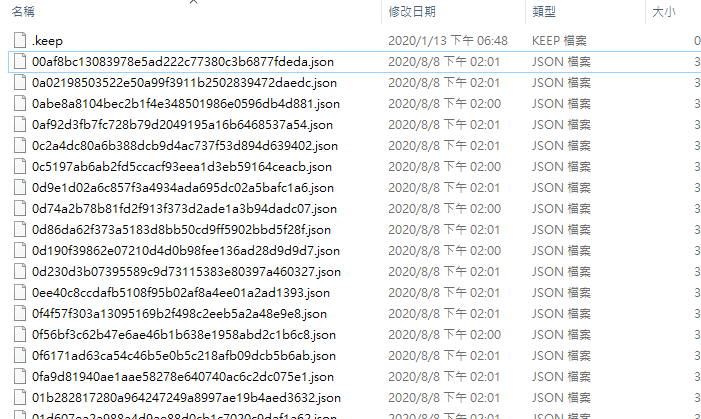
建立完成後,到accounts資料夾看到非常多的json檔,每個json檔都是一個service帳號
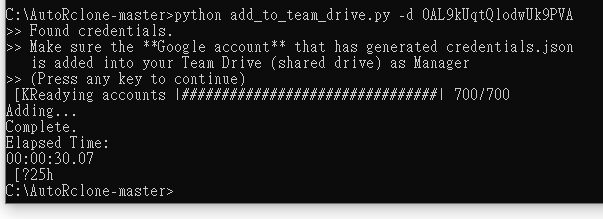
加入service帳號到team drive
1
|
python add_to_team_drive.py -d SharedTeamDriveSrcID
|
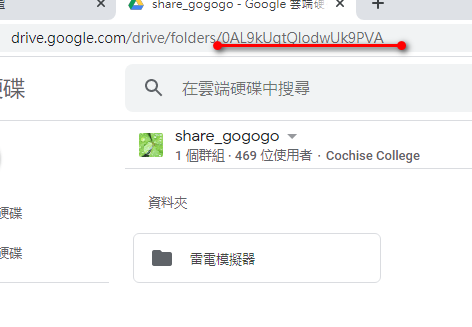
取得team drive的ID,例如:0AL9kUqtQlodwUk9PVA
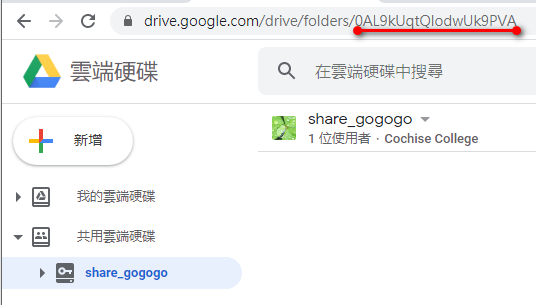
注意:一個team drive最多只能加入600個使用者
如果有600個service帳號卻沒有加入滿到600,只需要多執行幾次就可以,直到加入到600個
到這裡就快完成啦
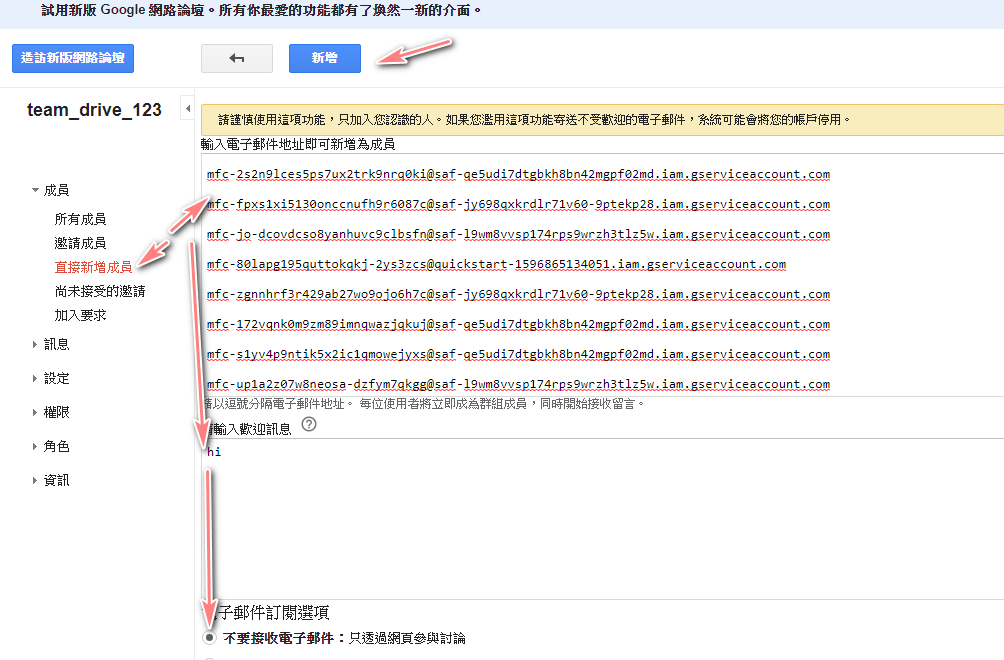
- 使用 groups論壇,建立群組並手動加入service帳號
使用python 腳本 將每個json email 整理至一個文件內,方便複製加入
將腳本下載放至AutoRclone-master資料夾內
python 腳本下載
執行命令,跑完之後資料夾內會出現一個email.txt,打開此文件
1
|
python find_email_to_save_txt.py
|
建立 群組論壇
groups.google.com
注意:一天只能新增100個成員
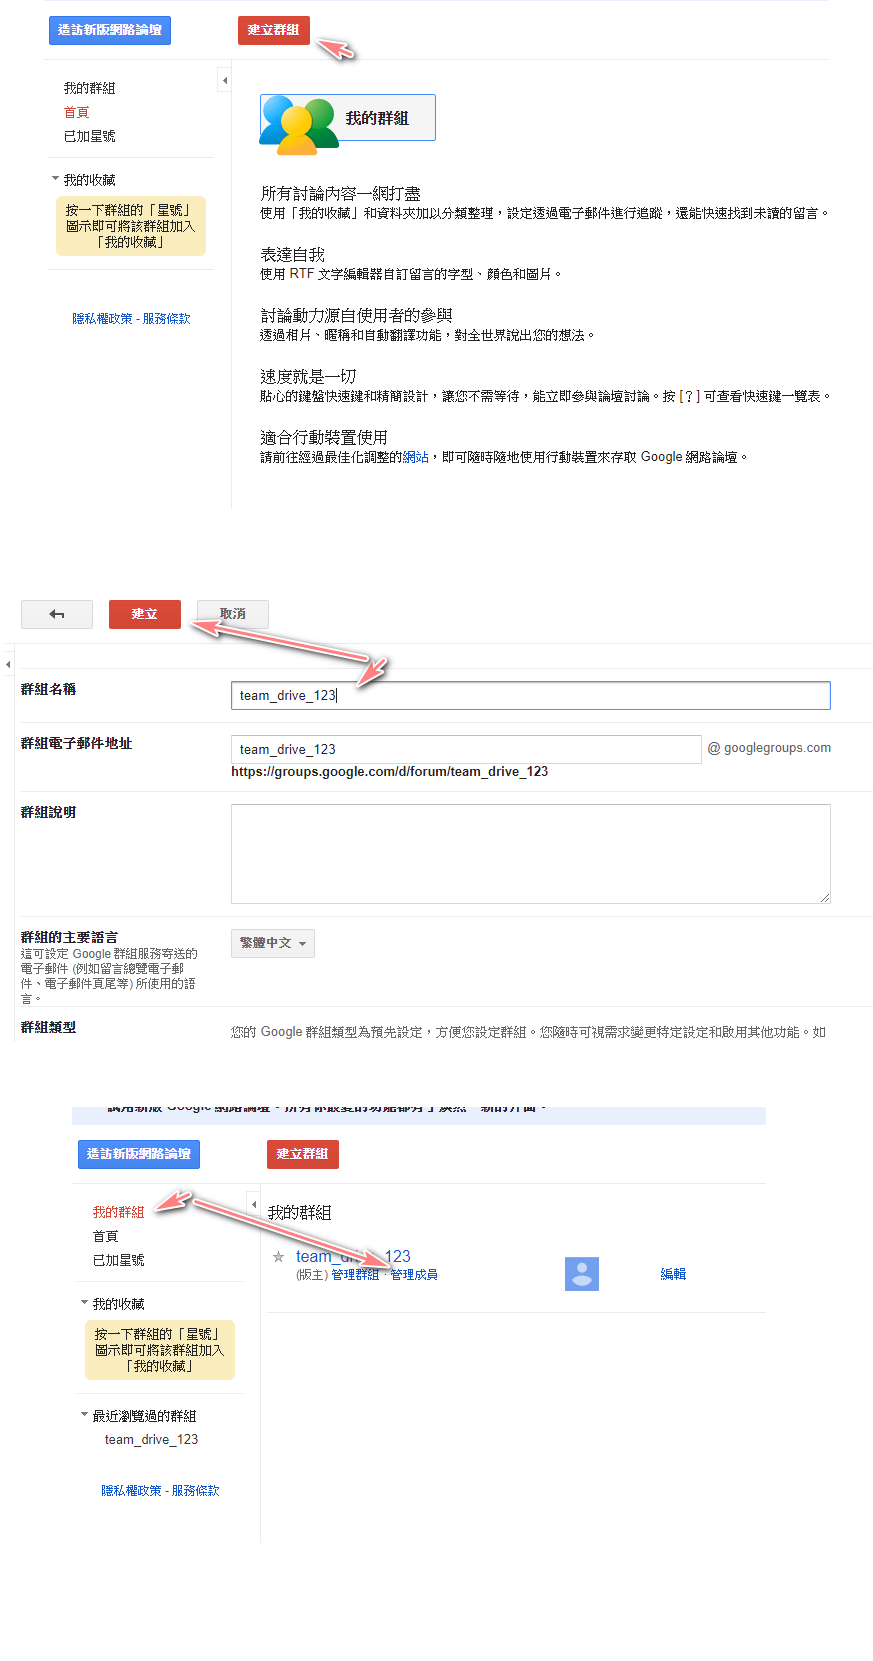
取得群組email (非常重要)
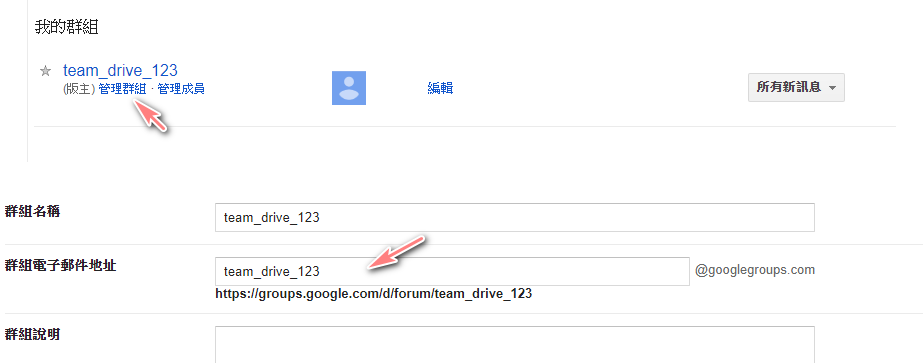
例如:[email protected]
將群組EMAIL加入到Team drive
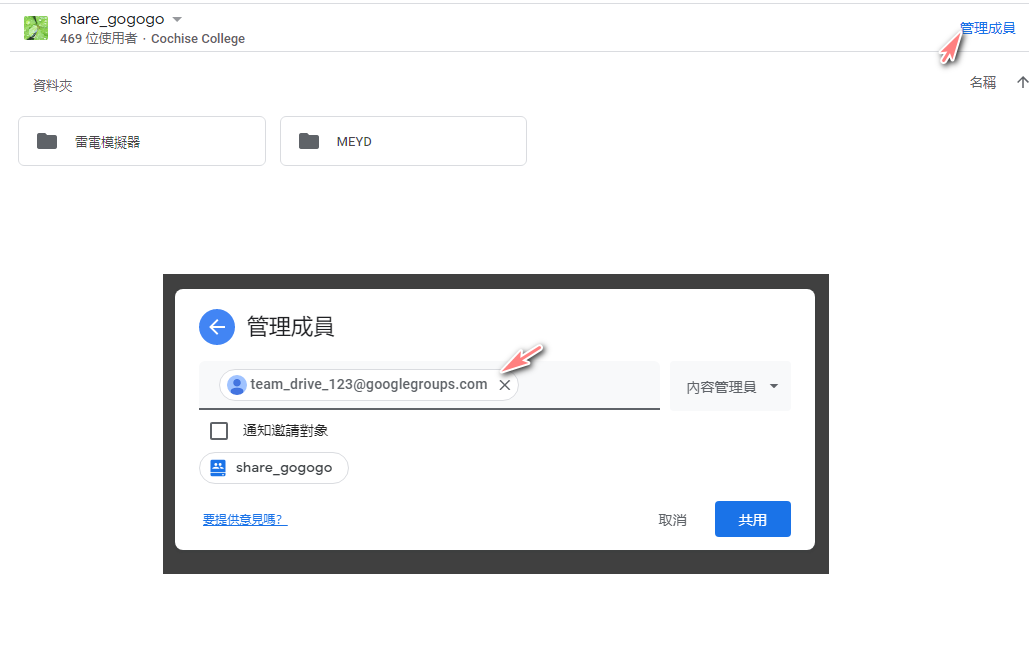
GSuite Admin 加入成員方法
step-3-add-service-accounts-to-google-groups-optional-but-recommended-for-hassle-free-long-term-use
gclone建立設定
gclone config

  1
  2
  3
  4
  5
  6
  7
  8
  9
 10
 11
 12
 13
 14
 15
 16
 17
 18
 19
 20
 21
 22
 23
 24
 25
 26
 27
 28
 29
 30
 31
 32
 33
 34
 35
 36
 37
 38
 39
 40
 41
 42
 43
 44
 45
 46
 47
 48
 49
 50
 51
 52
 53
 54
 55
 56
 57
 58
 59
 60
 61
 62
 63
 64
 65
 66
 67
 68
 69
 70
 71
 72
 73
 74
 75
 76
 77
 78
 79
 80
 81
 82
 83
 84
 85
 86
 87
 88
 89
 90
 91
 92
 93
 94
 95
 96
 97
 98
 99
100
101
102
103
104
105
106
107
108
109
110
111
112
113
114
115
116
117
118
119
120
121
122
123
124
125
126
127
128
129
130
131
132
133
134
135
136
137
138
139
140
141
142
143
144
145
146
147
148
149
150
151
152
153
154
155
156
157
158
159
160
161
162
163
164
165
|
Type of storage to configure.
Enter a string value. Press Enter for the default ("").
Choose a number from below, or type in your own value
 1 / 1Fichier
   \ "fichier"
 2 / Alias for an existing remote
   \ "alias"
 3 / Amazon Drive
   \ "amazon cloud drive"
 4 / Amazon S3 Compliant Storage Provider (AWS, Alibaba, Ceph, Digital Ocean, Dreamhost, IBM COS, Minio, etc)
   \ "s3"
 5 / Backblaze B2
   \ "b2"
 6 / Box
   \ "box"
 7 / Cache a remote
   \ "cache"
 8 / Citrix Sharefile
   \ "sharefile"
 9 / Dropbox
   \ "dropbox"
10 / Encrypt/Decrypt a remote
   \ "crypt"
11 / FTP Connection
   \ "ftp"
12 / Google Cloud Storage (this is not Google Drive)
   \ "google cloud storage"
13 / Google Drive
   \ "drive"
14 / Google Photos
   \ "google photos"
15 / Hubic
   \ "hubic"
16 / In memory object storage system.
   \ "memory"
17 / JottaCloud
   \ "jottacloud"
18 / Koofr
   \ "koofr"
19 / Local Disk
   \ "local"
20 / Mail.ru Cloud
   \ "mailru"
21 / Mega
   \ "mega"
22 / Microsoft Azure Blob Storage
   \ "azureblob"
23 / Microsoft OneDrive
   \ "onedrive"
24 / OpenDrive
   \ "opendrive"
25 / Openstack Swift (Rackspace Cloud Files, Memset Memstore, OVH)
   \ "swift"
26 / Pcloud
   \ "pcloud"
27 / Put.io
   \ "putio"
28 / QingCloud Object Storage
   \ "qingstor"
29 / SSH/SFTP Connection
   \ "sftp"
30 / Sugarsync
   \ "sugarsync"
31 / Transparently chunk/split large files
   \ "chunker"
32 / Union merges the contents of several remotes
   \ "union"
33 / Webdav
   \ "webdav"
34 / Yandex Disk
   \ "yandex"
35 / http Connection
   \ "http"
36 / premiumize.me
   \ "premiumizeme"
Storage> 13  < 輸入 13 google drive
** See help for drive backend at: https://rclone.org/drive/ **

Google Application Client Id
Setting your own is recommended.
See https://rclone.org/drive/#making-your-own-client-id for how to create your own.
If you leave this blank, it will use an internal key which is low performance.
Enter a string value. Press Enter for the default ("").
client_id> (留空白 按ENTER,官方建議可以使用自己的client_id,可以避免官方api過度使用導致調用失敗)
Google Application Client Secret
Setting your own is recommended.
Enter a string value. Press Enter for the default ("").
client_secret> (留空白,按ENTER)
Scope that rclone should use when requesting access from drive.
Enter a string value. Press Enter for the default ("").
Choose a number from below, or type in your own value
 1 / Full access all files, excluding Application Data Folder.
   \ "drive"
 2 / Read-only access to file metadata and file contents.
   \ "drive.readonly"
   / Access to files created by rclone only.
 3 | These are visible in the drive website.
   | File authorization is revoked when the user deauthorizes the app.
   \ "drive.file"
   / Allows read and write access to the Application Data folder.
 4 | This is not visible in the drive website.
   \ "drive.appfolder"
   / Allows read-only access to file metadata but
 5 | does not allow any access to read or download file content.
   \ "drive.metadata.readonly"
scope> 1 (輸入 1)
ID of the root folder
Leave blank normally.

Fill in to access "Computers" folders (see docs), or for rclone to use
a non root folder as its starting point.

Note that if this is blank, the first time rclone runs it will fill it
in with the ID of the root folder.

Enter a string value. Press Enter for the default ("").
root_folder_id> (留空白,如果想要以一個資料夾為根目錄可以輸入該資料夾ID)
Service Account Credentials JSON file path
Leave blank normally.
Needed only if you want use SA instead of interactive login.
Enter a string value. Press Enter for the default ("").
service_account_file>/AutoRclone-master/accounts/00af8bc13083978e5ad222c77380c3b6877fdeda.json  (到accounts資料夾隨便找一個json檔名,不要輸入與我一樣的,每個人路徑與檔名都不同)
Service Account Credentials JSON file path .

Enter a string value. Press Enter for the default ("").
service_account_file_path> /AutoRclone-master/accounts/  (後面必須加入/,不輸入/可能出錯)
Edit advanced config? (y/n)  (此部分是高級設定)
y) Yes
n) No (default)
y/n> n  (輸入n)
Configure this as a team drive? (是否使用 team drive 輸入Y)
y) Yes
n) No (default)
y/n> y
Fetching team drive list...
Choose a number from below, or type in your own value
 1 / share_gogogo  (這是我的team drive,每個人名稱不同,如果有多個team drive 選擇自己要的team drive)
   \ "0AL9kUqtQlodwUk9PVA"
Enter a Team Drive ID> 1
--------------------
[gd_team]
type = drive
scope = drive
service_account_file = /AutoRclone-master/accounts/00af8bc13083978e5ad222c77380c3b6877fdeda.json
service_account_file_path = /AutoRclone-master/accounts/
team_drive = 0AL9kUqtQlodwUk9PVA
--------------------
y) Yes this is OK (default)
e) Edit this remote
d) Delete this remote
y/e/d> y (輸入Y)

(需要注意你的name,copy資料需要用到)
Name                 Type
====                 ====
gd_team              drive

e) Edit existing remote
n) New remote
d) Delete remote
r) Rename remote
c) Copy remote
s) Set configuration password
q) Quit config
e/n/d/r/c/s/q> q 按Q退出
|
到這裡就設定完成啦,接下來看看如何使用gclone copy資料,copy到你看不完的資料
之後想要更改設定只需要再輸入 gclone config 再輸入 E 即可編輯設定
 1
 2
 3
 4
 5
 6
 7
 8
 9
10
11
12
13
14
15
|
>gclone config
Current remotes:

Name                 Type
====                 ====
gd_team              drive

e) Edit existing remote
n) New remote
d) Delete remote
r) Rename remote
c) Copy remote
s) Set configuration password
q) Quit config
e/n/d/r/c/s/q> e
|
指令使用方式
gclone 指令
作者github
1
|
gclone copy gd_team:{源} gd_team:my team name/資料夾1/資料夾2/ --drive-server-side-across-configs -v
|
實際使用方法:
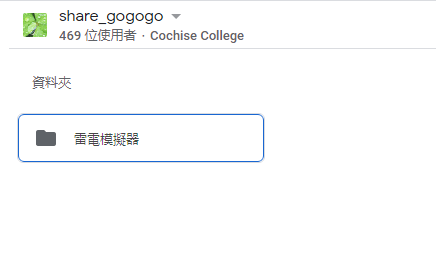
我的共享盤名稱是:share_gogogo
要copy的檔案:https://drive.google.com/uc?id=1l_dr7tqoNZja94b_AZ3LLmfLr8xk4g8x
取得網址的ID,1l_dr7tqoNZja94b_AZ3LLmfLr8xk4g8x
因為設定時候已經設定好team drive,所以不用再次輸入team drive名稱
1
|
gclone copy gd_team:{1l_dr7tqoNZja94b_AZ3LLmfLr8xk4g8x} gd_team:雷電模擬器 --drive-server-side-across-configs -v
|

資料夾結構
也可以指定其他team drive,注意必須要加入權限帳號,有允許權限才能複製到指定的雲端硬碟
1
|
gclone copy gc:{folde_id1} gc:{folde_id2} --drive-server-side-across-configs
|
Autorclone 指令
使用Autorclone copy資料
需求:rclone
- rclone 安裝
- 下載rclone,需注意妳的作業系統及位元
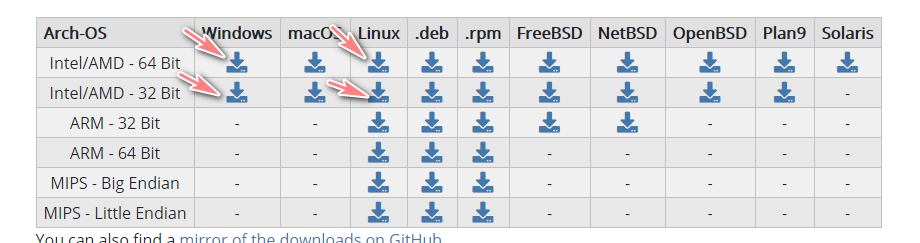
- 解壓縮檔案後,會得到
rclone-v1.52.3一個資料夾
- 放到C槽並加入環境變數
啟動環境變數
快捷鍵:win + R
輸入:rundll32.exe sysdm.cpl,EditEnvironmentVariables

重新開啟cmd 輸入 rclone -h ,有顯示一推指令說明 代表安裝正常
SourceID = 源檔案,需copy的資料ID
DestinationID = 自己的team drive id
DestinationPathName = 路徑(資料夾) 會自動建立資料夾,不需要手動新增
1
|
python rclone_sa_magic.py -s SourceID -d DestinationID -dp DestinationPathName -b 1 -e 600
|
取得自己team drive id
檢查大小
如果沒有源路徑及目標路徑 不需輸入,路徑也就是資料夾意思
rclone –config rclone.conf size –disable ListR src001:源路徑
rclone –config rclone.conf size –disable ListR dst001:目標路徑
指令幫助說明
1
|
python rclone_sa_magic.py -h
|
AutoRclone作者的教學
https://gsuitems.com/index.php/archives/13/
建立自己的client_id

修改 client_id 及 client_secret
  1
  2
  3
  4
  5
  6
  7
  8
  9
 10
 11
 12
 13
 14
 15
 16
 17
 18
 19
 20
 21
 22
 23
 24
 25
 26
 27
 28
 29
 30
 31
 32
 33
 34
 35
 36
 37
 38
 39
 40
 41
 42
 43
 44
 45
 46
 47
 48
 49
 50
 51
 52
 53
 54
 55
 56
 57
 58
 59
 60
 61
 62
 63
 64
 65
 66
 67
 68
 69
 70
 71
 72
 73
 74
 75
 76
 77
 78
 79
 80
 81
 82
 83
 84
 85
 86
 87
 88
 89
 90
 91
 92
 93
 94
 95
 96
 97
 98
 99
100
101
102
103
104
105
106
|
c:\AutoRclone-master>gclone config
Current remotes:

Name                 Type
====                 ====
gd_team              drive

e) Edit existing remote
n) New remote
d) Delete remote
r) Rename remote
c) Copy remote
s) Set configuration password
q) Quit config
e/n/d/r/c/s/q> e
Choose a number from below, or type in an existing value
 1 > gd_team
remote> 1
--------------------
[gd_team]
type = drive
scope = drive
service_account_file = /AutoRclone-master/accounts/00af8bc13083978e5ad222c77380c3b6877fdeda.json
service_account_file_path = /AutoRclone-master/accounts/
team_drive = 0AL9kUqtQlodwUk9PVA
--------------------
Edit remote
** See help for drive backend at: https://rclone.org/drive/ **

Value "client_id" = ""
Edit? (y/n)>
y) Yes
n) No (default)
y/n> y
Google Application Client Id
Setting your own is recommended.
See https://rclone.org/drive/#making-your-own-client-id for how to create your own.
If you leave this blank, it will use an internal key which is low performance.
Enter a string value. Press Enter for the default ("").
client_id> 75484848268-tr0lm3aoi6a6uuedv0bn2fnrsjqqvqep.apps.googleusercontent.com
Value "client_secret" = ""
Edit? (y/n)>
y) Yes
n) No (default)
y/n> y
Google Application Client Secret
Setting your own is recommended.
Enter a string value. Press Enter for the default ("").
client_secret> dJty5bR1TXYVzRyuS9JmQ8u0
Value "scope" = "drive"
Edit? (y/n)>
y) Yes
n) No (default)
y/n> n
Value "root_folder_id" = ""
Edit? (y/n)>
y) Yes
n) No (default)
y/n> n
Value "service_account_file" = "/AutoRclone-master/accounts/00af8bc13083978e5ad222c77380c3b6877fdeda.json"
Edit? (y/n)>
y) Yes
n) No (default)
y/n> n
Value "service_account_file_path" = "/AutoRclone-master/accounts/"
Edit? (y/n)>
y) Yes
n) No (default)
y/n> n
Edit advanced config? (y/n)
y) Yes
n) No (default)
y/n> n
--------------------
[gd_team]
type = drive
scope = drive
service_account_file = /AutoRclone-master/accounts/00af8bc13083978e5ad222c77380c3b6877fdeda.json
service_account_file_path = /AutoRclone-master/accounts/
team_drive = 0AL9kUqtQlodwUk9PVA
client_id = 75484848268-tr0lm3aoi6a6uuedv0bn2fnrsjqqvqep.apps.googleusercontent.com
client_secret = dJty5bR1TXYVzRyuS9JmQ8u0
--------------------
y) Yes this is OK (default)
e) Edit this remote
d) Delete this remote
y/e/d> y
Remote config
Change current team drive ID "0AL9kUqtQlodwUk9PVA"?
y) Yes
n) No (default)
y/n> n
Current remotes:

Name                 Type
====                 ====
gd_team              drive

e) Edit existing remote
n) New remote
d) Delete remote
r) Rename remote
c) Copy remote
s) Set configuration password
q) Quit config
e/n/d/r/c/s/q>
|
問題
使用gclone可以傳送幾個檔案之後會有錯誤訊息
panic: runtime error: invalid memory address or nil pointer dereference
為了快速解決問題,不使用gclone指令,建議直接使用Autorclone指令處理
問題除錯
編輯設定指令:gclone config
root_folder_id有錯誤的話,無法複製到你指定的共享資料夾及團隊盤
確定 root_folder_id 是否為”"(空) 或是 輸入正確資料夾ID
參考文章
若此篇文章你還是看不懂,請看下列的文章及影片